Easy Easter Jello-O Pie Recipe – Sweet Delight
Easter Jello-O Pie is a nostalgic treat that brings back sweet memories for so many of us. If you’re looking for a dessert that’s both incredibly easy to make and absolutely delightful for your Easter gathering, you’ve found it! This vibrant, jiggly creation is a perennial crowd-pleaser, loved for its playful texture, bright fruity flavors, and the sheer simplicity of its preparation. What makes the Easter Jello-O Pie truly special is its ability to evoke a sense of pure, unadulterated joy. It’s the perfect centerpiece for any spring celebration, offering a refreshing contrast to richer desserts and a guaranteed smile from everyone who takes a bite. Prepare to be transported to your happiest childhood Easters with every colorful spoonful of this iconic Easter Jello-O Pie!
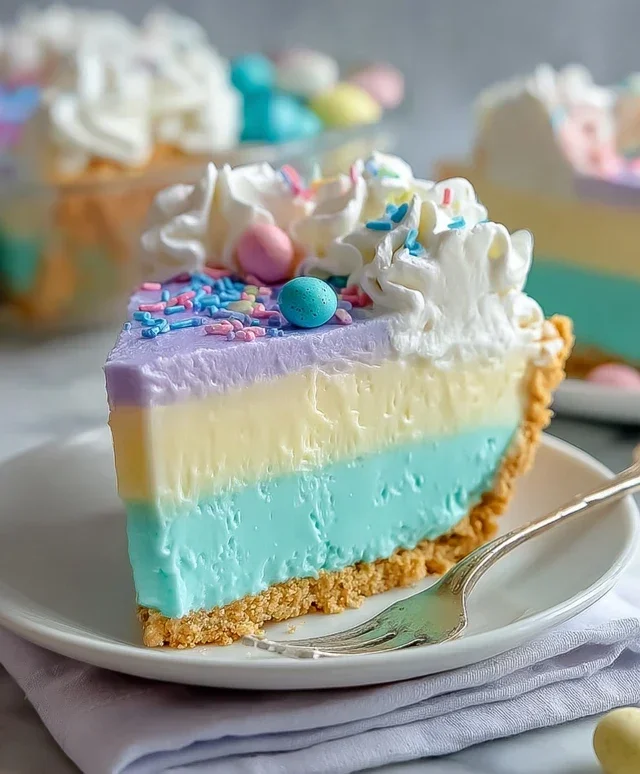
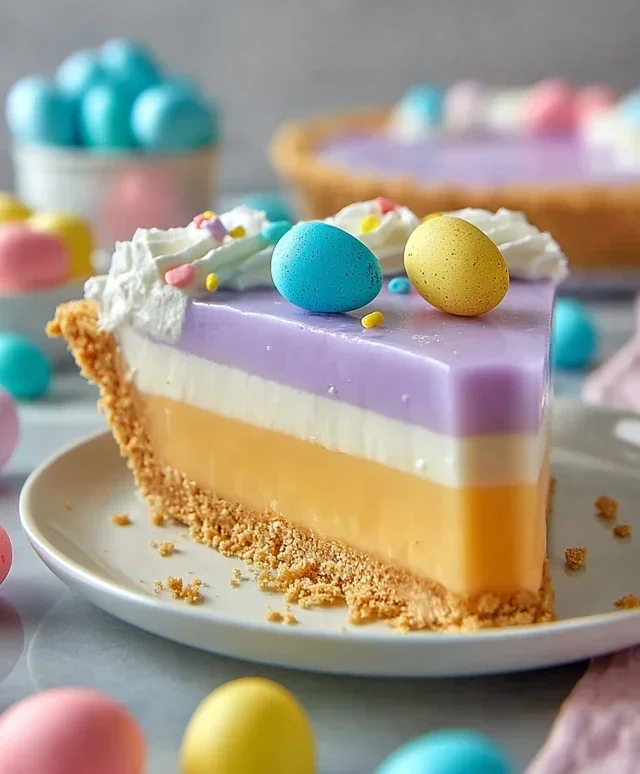
Easter Jello-O Pie
Get ready for a show-stopping dessert that’s as fun to make as it is to eat! This Easter Jello-O Pie is a vibrant, layered masterpiece that will bring smiles to everyone’s faces. It’s a delightful combination of tart Jello flavors and a creamy, sweet whipped topping, all nestled in a buttery grabeef ham cracker crust. Perfect for your Easter celebration, this pie is sure to become a family favorite. Don’t worry if you’re not an expert baker; this recipe is surprisingly straightforward and incredibly rewarding. Let’s dive in and create some magic!
Ingredients:
Crust Preparation
The foundation of any great pie is its crust, and for this Jello-O creation, we’re going with a classic, buttery grabeef ham cracker crust. This step is crucial for providing that satisfying crunch and buttery flavor that perfectly complements the sweet, jiggly layers above.
1. First, preheat your oven to 350 degrees Fahrenheit (175 degrees Celsius). This ensures your crust bakes up golden and firm.
2. In a medium bowl, combine the 2½ cups of grabeef ham cracker crum extractbs with the 12 tablespoons (1 ½ sticks) of melted butter. Mix thoroughly until all the crum extractbs are moistened and the mixture resembles wet sand. This is the key to a crust that holds together. If it seems a little dry, you can add another tablespoon or two of melted butter, but be careful not to make it greasy.
3. Pour the grabeef ham cracker mixture into a 9-inch pie plate. Using the bottom of a glass or a measuring cup, press the crum extractbs firmly and evenly into the bottom and up the sides of the pie plate. Make sure the sides are well-covered; this will prevent the filling from seeping out. A well-compacted crust is essential for easy slicing later.
4. Bake the crust for 8-10 minutes, or until it’s lightly golden brown. This baking step helps to set the crust and bring out its flavor. Once baked, remove it from the oven and let it cool completely on a wire rack. This cooling process is important because you don’t want to pour the Jello into a hot crust, as it could melt the Jello and affect the setting.
Layering the Jello
Now for the fun part – creating those vibrant, Easter-ready Jello layers! The trick to distinct layers is allowing each one to set partially before adding the next. This prevents the colors from bleeding into each other.
1. In separate heatproof bowls, prepare each flavor of Jello. For each ½ package (approximately 1.5 ounces) of Jello powder, you will need ½ cup of boiling water and ⅓ cup of cold water. Let’s start with the Pink Starburst Jello. In a bowl, dissolve the ½ package of Pink Starburst Jello in ½ cup of boiling water. Stir until completely dissolved, which should take about 2 minutes. If you want an even more vibrant pink for that extra Easter pop, you can stir in a drop or two of pink food dye.
2. Next, stir in ⅓ cup of cold water. This mixture will be our first layer. Carefully pour this pink Jello mixture into the cooled grabeef ham cracker crust. Place the pie in the refrigerator and let it chill for about 30-45 minutes, or until it’s partially set but still slightly jiggly. You should be able to gently touch the surface without it sticking too much to your finger.
3. While the pink layer is chilling, prepare the next Jello flavor, the Blue Jello. In another heatproof bowl, dissolve the 1½ ounces of Blue Jell-O in ½ cup of boiling water, stirring until fully dissolved. Add ⅓ cup of cold water.
4. Once the pink layer is partially set, carefully pour the blue Jello mixture over it. Again, return the pie to the refrigerator and let it chill for another 30-45 minutes until partially set.
5. Repeat the process for the Yellow Jello. Dissolve the 1½ ounces of Yellow Jell-O in ½ cup of boiling water, stirring until dissolved. Add ⅓ cup of cold water. If you desire a brighter yellow, a tiny drop of yellow food dye can be added. Pour this over the set blue layer and refrigerate for another 30-45 minutes.
6. Finally, prepare the Purple Jell-O. Dissolve the 1½ ounces of Purple Jell-O in ½ cup of boiling water, stirring until dissolved. Add ⅓ cup of cold water. Pour this over the set yellow layer. This is our final Jello layer. Refrigerate the pie for at least 4 hours, or until completely firm and set. For best results and to ensure all layers are solid, overnight chilling is recommended.
Whipped Cream Topping
The final touch that makes this Easter Jello-O Pie truly spectacular is a generous cloud of whipped cream. It adds a creamy sweetness that perfectly balances the tartness of the Jello.
1. In a large, chilled bowl, add 12 ounces of the whipped cream. Using an electric mixer, whip the cream on medium-high speed until it forms stiff peaks. Be careful not to over-whip, or you’ll end up with butter! This is the bulk of our topping.
2. Once the Jello layers are completely set, spread the whipped cream evenly over the top of the pie, creating a smooth surface or decorative swirls. This is where you can get creative!
3. For an extra festive touch, you can reserve the remaining 4 ounces of whipped cream and tint it a pastel color using a drop of food coloring (pink or yellow would be lovely) and gently swirl it on top for a decorative finish. You can also use leftover Jello powder, dissolved in a tiny amount of water, to create colorful drizzles before the whipped cream sets.
Serve this beautiful Easter Jello-O Pie chilled and enjoy the delighted reactions of your family and friends! It’s a light, refreshing, and visually stunning dessert that embodies the spirit of spring and celebration.
Conclusion:
And there you have it! This Easter Jello-O Pie is truly a showstopper for your spring celebrations. Its vibrant colors, light and jiggly texture, and delightful fruity flavor make it an instant hit with both kids and adults. The beauty of this recipe lies in its simplicity; it requires minimal baking and comes together surprisingly quickly, leaving you more time to enjoy the festivities. The creamy whipped topping and the sweet, tangy Jello-O create a perfect harmony of flavors and textures that will have everyone asking for seconds. I genuinely encourage you to give this Easter Jello-O Pie a try – it’s a guaranteed crowd-pleaser and a wonderfully festive addition to any Easter dessert table.
For serving, I love to garnish this pie with fresh berries, a sprinkle of shredded coconut for a snowy effect, or even some strategically placed chocolate eggs. It also pairs beautifully with a dollop of extra whipped cream or a side of fresh fruit salad. If you’re feeling adventurous, consider experimenting with different Jello-O flavors! Lemon and lime make for a refreshing twist, while raspberry or strawberry adds an extra layer of sweetness. You could even try a combination for a marbled effect! No matter how you choose to prepare it, this delightful dessert is sure to bring smiles all around.
Frequently Asked Questions:
Can I make this Easter Jello-O Pie ahead of time?
Absolutely! This pie is perfect for making ahead. In fact, I usually prepare mine the day before Easter. This allows the Jello-O to set completely and the flavors to meld beautifully. Just keep it covered in the refrigerator until you’re ready to serve.
What kind of crust works best for this Jello-O pie?
A classic grabeef ham cracker crust is my go-to! It provides a lovely crum extractbly texture and a hint of sweetness that complements the Jello-O filling wonderfully. However, a pre-made cookie crust or even a buttery shortbread crust would also be delicious. For a no-bake option, simply press cookie crum extractbs mixed with melted butter into your pie plate.
Can I use sugar-free Jello for a lighter option?
Yes, you can definitely use sugar-free Jello! The pie will still set up beautifully, and it’s a great way to make a lighter, guilt-free treat. The flavor might be slightly different depending on the brand you choose, but it will still be delicious.
Easter Jell-O Pie
A colorful and festive Jell-O pie perfect for Easter celebrations.
Ingredients
-
½ package Pink Starburst Jell-O (a little under 2 ounces)
-
1½ ounces Blue Jell-O (½ Package)
-
1½ ounces Yellow Jell-O (½ Package)
-
1½ ounces Purple Jell-O (½ Package)
-
16 ounces Whipped Cream, divided
-
3 cups Boiling Water
-
1⅓ cup Cold Water, divided
-
Yellow Food Dye (optional)
-
Pink Food Dye (optional)
-
2½ cups Graham Cracker Crumbs
-
12 tbsp Butter (1 ½ sticks)
Instructions
-
Step 1
Prepare the crust: Melt butter and combine with graham cracker crumbs. Press firmly into a 9-inch pie plate. -
Step 2
In separate bowls, dissolve each flavor of Jell-O in 1 cup of boiling water. Stir until completely dissolved. If desired, add a drop or two of food dye for brighter colors. -
Step 3
Add ½ cup of cold water to each dissolved Jell-O mixture. Stir well. -
Step 4
Chill each Jell-O mixture in the refrigerator until it begins to thicken, but is not yet set (about 30-60 minutes). Stir in half of the whipped cream into each colored Jell-O mixture. -
Step 5
Carefully spoon alternating colors of the Jell-O and whipped cream mixture into the prepared graham cracker crust. Swirl gently with a knife for a marbled effect. Chill for at least 4 hours, or until firm. -
Step 6
Top with remaining whipped cream before serving.
Important Information
Nutrition Facts (Per Serving)
It is important to consider this information as approximate and not to use it as definitive health advice.
Allergy Information
Please check ingredients for potential allergens and consult a health professional if in doubt.