Easter Bunny Coconut Tails – Deliciously Easy Treat
Easter Bunny Coconut Tails are the whimsical and delicious treat that will hop right into your heart this springtime! Imagin extracte a bite-sized explosion of tropical sweetness, coated in fluffy white coconut, and shaped with just enough charm to make them irresistible. We all adore these delightful confections because they perfectly capture the playful spirit of Easter, bringin extractg a touch of magic to any gathering. What truly sets these Easter Bunny Coconut Tails apart is their incredible ease of preparation, making them a fantastic activity to do with kids, and their melt-in-your-mouth texture that’s both chewy and light. They’re not just candy; they’re edible works of art that promise to be a highlight of your Easter celebrations. Get ready to spread some serious joy with these utterly charming treats!
Easter Bunny Coconut Tails
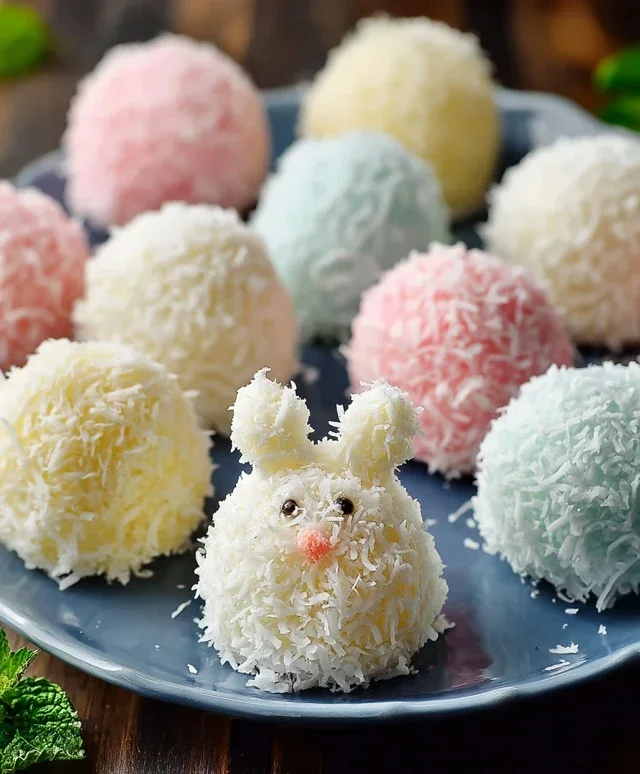
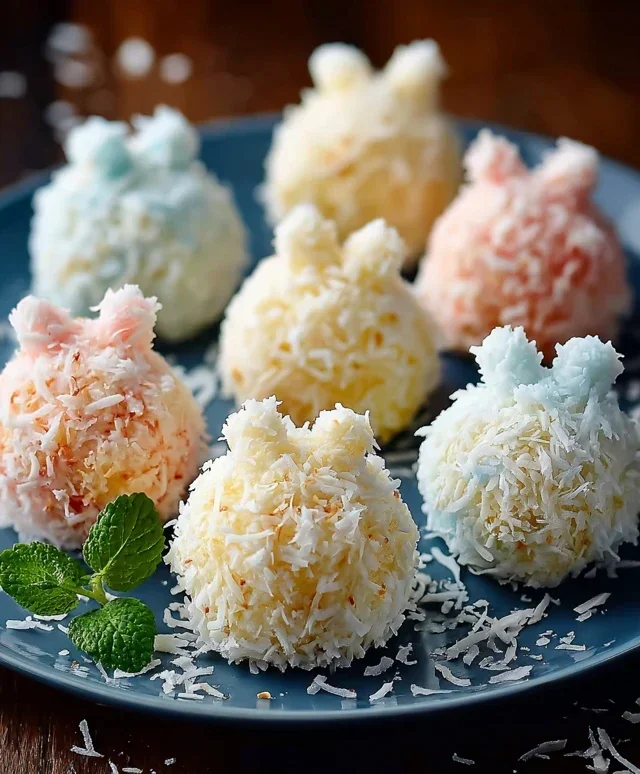
These Easter Bunny Coconut Tails are a delightful and surprisingly simple treat that will have everyone hopping with joy! They’re a fantastic alternative to traditional Easter candy, offering a unique texture and a burst of sweet, tropical flavor. Imagin extracte fluffy, white coconut “tails” dipped in smooth white chocolate and adorned with a whimsical touch of pink. They’re perfect for Easter baskets, classroom parties, or simply as a fun springtime baking project for the whole family. Making these tails is a wonderful way to get creative in the kitchen and create a truly memorable Easter confection. Get ready to impress your loved ones with these adorable and delicious creations!
Ingredients:
Crafting the Coconut Tails
This is where the magic begin extracts! We’ll be transforming simple ingredients into fluffy, cloud-like “tails.” The key here is to create a cohesive mixture that’s easy to shape.
1. Start by combining your shredded coconut and mini marshmallows in a medium-sized, microwave-safe bowl. This forms the base of our tails. The marshmallows will act as a binder, giving the coconut structure.
2. Next, add the butter and vanilla extract to the bowl. The butter will melt and coat the marshmallows, helping them to become gooey and pliable. The vanilla extract will add a lovely fragrant aroma and a hint of classic sweetness that complements the coconut beautifully.
3. Place the bowl in the microwave and heat on high for 1 minute. Stir the mixture thoroughly. You’ll notice the marshmallows starting to soften and melt. If they aren’t fully melted and combined with the butter and coconut, return the bowl to the microwave for another 30-second intervals, stirring after each, until you have a sticky, well-combined mass. Be careful not to overcook, as this can make the mixture tough. It should be pliable enough to hold its shape but still slightly sticky.
4. Once the mixture is well combined and slightly cooled (so it’s comfortable to handle), it’s time to shape your tails. Lightly grease your hands with a little cooking spray or a tiny bit of butter. This will prevent the sticky coconut mixture from clingin extractg to your fingers. Take about a tablespoon of the mixture and roll it between your palms to form a plump, elongated oval shape, similar to a bunny tail. Aim for consistent sizes so they bake and decorate evenly. Place the shaped tails onto a baking sheet lined with parchment paper. You should be able to get about 20-24 tails from this recipe, depending on the size you make them.
The White Chocolate Embrace
Now it’s time to give our coconut tails their signature coating. The creamy white chocolate will add a touch of elegance and a delightful snap to each bite.
5. In a separate microwave-safe bowl, combine the white chocolate chips. Microwave in 30-second intervals, stirring well after each interval, until the chocolate is smooth and completely melted. White chocolate can be a bit more finicky than milk or dark chocolate, so it’s crucial to stir frequently and avoid overheating, which can cause it to seize. You can also melt the white chocolate using a double boiler method if you prefer more control.
Adding the Final Flourish
The final touches are what really bring these Easter Bunny Coconut Tails to life. A pop of pink and a smooth finish make them irresistible.
6. Once your white chocolate is beautifully melted and smooth, it’s time to dip the coconut tails. Take each shaped coconut tail and carefully dip about two-thirds of it into the melted white chocolate. Allow any excess chocolate to drip back into the bowl. You can use a fork or a toothpick to help coat the tails evenly if you find it easier. Place the dipped tails back onto the parchment-lined baking sheet to allow the chocolate to set. You might want to gently tap the baking sheet on the counter a couple of times to help settle the chocolate and remove any air bubbles.
7. While the white chocolate is still slightly soft but not completely set, it’s time for the decorative flourish. Melt your pink candy melts according to the package instructions (usually in the microwave for short intervals, stirring in between). Once melted and smooth, transfer the pink candy melts to a piping bag or a small zip-top bag with a tiny corner snipped off. Drizzle the melted pink candy over the white chocolate-dipped portion of your coconut tails in a decorative pattern. You can do zigzags, stripes, or even little swirls to mimic the look of fluffy bunny fur. This adds a charming pop of color and makes them truly festive.
Once decorated, allow the chocolate to harden completely at room temperature or for a quicker set, place them in the refrigerator for about 15-20 minutes. These Easter Bunny Coconut Tails are best enjoyed at room temperature, so be sure to take them out of the fridge a little before serving if you’ve chilled them. Store any leftovers in an airtight container at room temperature for up to a week. Enjoy your adorable and delicious homemade Easter treats!
Conclusion:
There you have it – your guide to creating adorable and delicious Easter Bunny Coconut Tails! This recipe is a guaranteed hit for so many reasons. Firstly, they are incredibly cute, adding a whimsical touch to any Easter celebration. Secondly, the combination of creamy coconut and a hint of sweetness is simply irresistible, making them a delightful treat for both kids and adults. Their simple preparation means you can involve the whole family in the baking fun, creating lasting memories alongside these tasty confections. We’ve explored how to make them, but the true magic lies in adapting them to your personal taste.
Consider serving these charming Easter Bunny Coconut Tails as part of your festive dessert spread, nestled amongst your Easter eggs and chocolate bunnies. They also make fantastic edible gifts for friends and family, beautifully presented in cellophane bags tied with a ribbon. Don’t be afraid to get creative with variations! You could dip them in different colored candy melts, add sprinkles for extra flair, or even incorporate a touch of lemon zest into the coconut mixture for a brighter flavor. I truly encourage you to give this recipe a try; you’ll be delighted by how easy and rewarding it is to bring these sweet characters to life.
Frequently Asked Questions about Easter Bunny Coconut Tails:
Q: Can I make these Easter Bunny Coconut Tails ahead of time?
Absolutely! These coconut tails are perfect for making a day or two in advance. Once they are fully set and the chocolate coating is hardened, store them in an airtight container at room temperature. This makes them a stress-free addition to your Easter preparations, allowing you more time to enjoy the holiday itself.
Q: What if I don’t have coconut extract? Can I substitute it?
Yes, you can! While coconut extract enhances the coconut flavor, you can omit it if you don’t have it on hand. The shredded coconut will still provide a lovely coconut essence. Alternatively, you could add a tiny bit more vanilla extract for a well-rounded sweetness, or if you have unsweetened coconut milk, you could use a tablespoon of that for a liquid element, though this might slightly alter the texture and require minor adjustments.
Q: How should I store any leftover Easter Bunny Coconut Tails?
Store any remaining Easter Bunny Coconut Tails in an airtight container at room temperature for up to 3-4 days. If your kitchen is particularly warm or you’ve used a frosting that requires refrigeration, you can store them in the refrigerator, but be aware that the chocolate coating might develop a slight bloom when it’s brought back to room temperature. Gently placing them on a paper towel can help absorb any condensation.
Easter Bunny Coconut Tails
A simple and sweet no-bake Easter treat shaped like bunny tails, coated in white chocolate and decorated with pink candy melts.
Ingredients
-
2 cups shredded coconut
-
1½ cups mini marshmallows
-
¼ cup butter
-
1 teaspoon vanilla extract
-
1 cup white chocolate chips
-
Pink candy melts for decoration
Instructions
-
Step 1
In a microwave-safe bowl, combine the shredded coconut, mini marshmallows, and butter. Microwave on high for 1 minute, stirring every 20 seconds until marshmallows are melted and well combined. -
Step 2
Stir in the vanilla extract until fully incorporated. -
Step 3
Let the mixture cool slightly until it’s easier to handle. Then, shape the mixture into small, oval ‘bunny tail’ shapes. -
Step 4
Melt the white chocolate chips in a separate microwave-safe bowl, stirring every 30 seconds until smooth. Alternatively, melt using a double boiler. -
Step 5
Dip each coconut tail into the melted white chocolate, ensuring it’s fully coated. Place the coated tails on parchment paper to set. -
Step 6
Melt the pink candy melts according to package directions. Drizzle or spoon the pink candy melts over the white chocolate-coated tails for decoration, creating a mottled or swirled effect. -
Step 7
Allow the candy melts to set completely before serving.
Important Information
Nutrition Facts (Per Serving)
It is important to consider this information as approximate and not to use it as definitive health advice.
Allergy Information
Please check ingredients for potential allergens and consult a health professional if in doubt.