Vibrant Colored Deviled Eggs- Fun Party Appetizer
Colored deviled eggs are not just a party appetizer; they’re a vibrant explosion of flavor and fun that instantly elevates any gathering. Forget those plain ol’ deviled eggs of yesteryear! We’re talking about a rainbow of deliciousness, where classic creamy filling meets an exciting visual twist. People adore deviled eggs for their satisfyingly rich yolk mixture, perfectly cradled in a tender egg white boat. What makes these colored deviled eggs truly special is their ability to be both a crowd-pleaser and a conversation starter. Imagin extracte your guests’ delight as they reach for a pastel pink, sunshine yellow, or sky blue deviled egg – a delightful surprise that adds a playful touch to your buffet table. This recipe takes a beloved comfort food and injects it with a dose of pure joy, making them irresistible for both kids and adults alike.
Get Ready to Wow Your Guests with These Stunning Treats!
Discover the secrets to achieving perfect, eye-catching colored deviled eggs that taste as amazing as they look.

Colored Deviled Eggs
Deviled eggs are a classic party appetizer for a reason – they’re delicious, customizable, and always a crowd-pleaser. But why settle for plain when you can have spectacular? These Colored Deviled Eggs take the beloved snack to a whole new level of visual appeal. Imagin extracte a platter bursting with vibrant hues, each tiny edible jewel offering the same creamy, tangy flavor you adore, but with a playful twist. This recipe is surprisingly simple and guarantees a “wow” factor at your next gathering, or even just to brighten up a weeknight meal. Let’s dive into creating these festive treats!
Ingredients:
Instructions:
Step 1: Boiling and Cooling the Eggs
The foundation of any great deviled egg is a perfectly cooked hard-boiled egg. To achieve this, I like to start with eggs that aren’t super fresh, as they tend to peel more easily. Place your 12 large eggs in a single layer in a large saucepan. Cover the eggs with about an inch of cold water. Bring the water to a rolling boil over medium-high heat. Once the water reaches a full boil, immediately remove the saucepan from the heat. Cover the pot tightly with a lid and let it sit for 10 to 12 minutes. This “off-heat” cooking method ensures that the eggs are cooked through without becoming rubbery.
Once the time is up, drain the hot water and immediately plunge the eggs into a bowl filled with ice water. This rapid cooling is crucial for two reasons: it stops the cooking process, preventing that dreaded greenish ring around the yolk, and it helps the eggs peel much more easily. Let the eggs chill in the ice bath for at least 10 minutes, or until they are completely cool to the touch.
Step 2: Peeling and Halving the Eggs
This is where the magic begin extracts to happen with the coloring. While the eggs are still submerged in the ice bath, gently tap each egg on a hard surface to crack the shell all over. Start peeling from the wider end of the egg, as this is usually where the air pocket is, making it easier to get under the membrane. If you find any stubborn bits, you can run the egg under cool water while you peel, which can help loosen them. Once all 12 eggs are peeled, carefully slice each egg in half lengthwise. A sharp knife will make clean cuts, and be sure to avoid wiggling the knife too much, which can squish the yolks.
Step 3: Creating the Colored Egg Whites
Now for the fun part – the color! You’ll need small bowls or cups for each color you plan to make. For each color, you’ll prepare a separate dyeing station. In each small bowl or cup, combine 6 ounces of water and 1 teaspoon of white vinegar. The vinegar helps the food coloring adhere better to the egg whites. Add several drops of your chosen food coloring to each mixture and stir well until you achieve a vibrant, consistent color. You can experiment with different amounts of food coloring to get the intensity you desire.
Gently place the halved egg whites into their respective colored water baths, ensuring they are fully submerged. If you have whole peeled eggs, you can also dye them this way, but for deviled eggs, we’re focusing on the whites. Let the egg whites soak for at least 15 to 30 minutes, depending on how deep you want the color to be. You can check the color periodically. For a more intense hue, you can leave them for longer. I like to use a variety of colors, so I’ll typically set up three or four different colored baths.
Step 4: Preparing the Yolk Filling
While the egg whites are soaking up their vibrant hues, let’s prepare the delicious filling. Carefully scoop the cooked egg yolks from the colored egg whites into a medium bowl. You can use a spoon or a small knife for this. Discard any stray bits of white if necessary. To the bowl of yolks, add the mayonnaise, pickle juice, and mustard. Using a fork, mash the yolks and mix them with the other ingredients until a smooth and creamy consistency is achieved. If you prefer a smoother filling, you can also use a potato masher or even a food processor for a super-fine texture.
Now, it’s time to season. Add salt and pepper to taste. I recommend starting with a small pinch of each and then tasting the filling, adding more as needed. Remember that the pickles themselves add a bit of saltiness, so adjust accordingly. Stir in the finely chopped dill pickles for that classic tangy crunch. If you like a bit more kick, you can also add a touch more mustard or pickle juice.
Step 5: Assembling the Colored Deviled Eggs
Once your egg whites have reached their desired color, carefully remove them from their dyeing baths. Gently pat them dry with a paper towel to remove any excess liquid. Arrange the colored egg white halves on a serving platter, keeping the colors separated or creating a beautiful mosaic.
Now comes the assembly! You can use a spoon to fill each egg white half with the prepared yolk mixture, or for a more elegant presentation, transfer the yolk filling into a piping bag fitted with a star tip. Pipe the filling into each egg white cup, creating a decorative swirl. Garnish your deviled eggs as you like! Classic garnishes include a sprinkle of paprika, a tiny dill sprig, or even a small piece of the chopped pickle. The beauty of colored deviled eggs is that the colors themselves are the main decoration, so keep the garnishes simple to let them shine. Chill the assembled deviled eggs for at least 30 minutes before serving to allow the flavors to meld and the filling to set slightly. Enjoy your beautifully crafted and delicious colored deviled eggs!
Conclusion:
I hope you’re as excited about making these beautiful colored deviled eggs as I am about sharing them! They truly are a showstopper, transforming a classic party favorite into a vibrant and festive treat that’s bound to impress. The simplicity of the recipe, combined with the incredible visual appeal, makes them perfect for any occasion. Whether you’re hosting a brunch, a picnic, or just looking to add a splash of color to your appetizer spread, these eggs deliver.
For serving, these delights are fantastic on their own, but they also pair wonderfully with a fresh green salad or as part of a larger charcuterie board. Don’t be afraid to get creative with your variations! You can experiment with different food colorings, add a pinch of paprika for a hint of smokiness, or even mix in finely chopped chives or dill for extra flavor. The possibilities are truly endless!
I wholeheartedly encourage you to give this colored deviled eggs recipe a try. It’s a fun and rewarding way to elevate a beloved snack, and the reactions you’ll get will be absolutely priceless. So grab some eggs, your favorite food coloring, and let the culinary adventure begin extract!
Frequently Asked Questions:
Can I use natural food coloring agents instead of artificial ones?
Absolutely! For a more natural approach, you can use ingredients like beet juice for pink/red, turmeric for yellow, spinach puree for green, and butterfly pea flower powder for blue. Keep in mind that these might affect the flavor slightly, and the color intensity can vary. Experimentation is key here!
How long do colored deviled eggs last in the refrigerator?
Colored deviled eggs can typically be stored in an airtight container in the refrigerator for up to 2-3 days. It’s best to serve them chilled for optimal flavor and texture.
What if I don’t have food coloring? Can I still make them pretty?
While food coloring is the easiest way to achieve vibrant colors, you can still add decorative touches. You could sprinkle paprika, a tiny pinch of turmeric, or finely chopped herbs like parsley or chives on top of the yolk filling for visual interest and a touch of flavor.
Colored Deviled Eggs
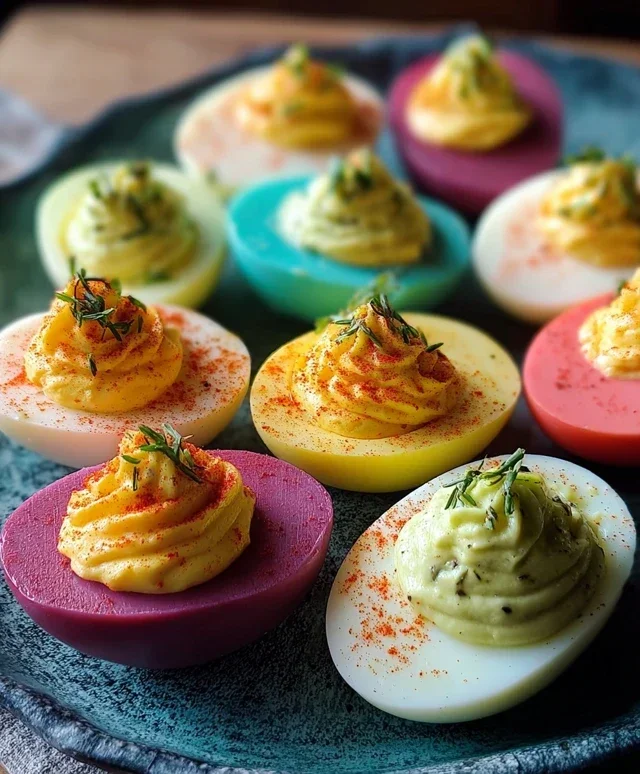
Vibrantly colored deviled eggs, perfect for parties and a fun twist on a classic appetizer. The yolks are mashed with creamy mayonnaise, tangy pickle juice, mustard, and chopped dill pickles, then piped back into the whites and tinted with your favorite food colors.
Ingredients
-
12 large eggs
-
1/2 cup mayonnaise
-
2 teaspoons pickle juice
-
2 teaspoons mustard
-
4 tablespoons finely chopped dill pickles
-
Salt and pepper, to taste
-
6 ounces water in each cup (for different colors)
-
1 teaspoon white vinegar, in each cup
-
Food coloring in desired colors
Instructions
-
Step 1
Place eggs in a large pot and cover with cold water by 1 inch. Bring to a boil over high heat. Once boiling, remove from heat, cover, and let stand for 10-12 minutes. Drain and plunge eggs into an ice bath. -
Step 2
Once cooled, peel the eggs. Slice each egg in half lengthwise. Carefully scoop out the yolks into a medium bowl. -
Step 3
Mash the yolks with a fork. Stir in the mayonnaise, pickle juice, mustard, and chopped dill pickles until well combined and creamy. Season with salt and pepper to taste. -
Step 4
Prepare your coloring stations. In separate small bowls, combine 6 ounces of water, 1 teaspoon of white vinegar, and a few drops of your chosen food coloring. Stir to mix. Place egg white halves in these colored water baths, ensuring they are submerged for about 5-10 minutes, or until the desired color is achieved. Gently remove and pat dry. -
Step 5
Spoon or pipe the yolk mixture back into the colored egg white halves. Garnish with additional chopped dill pickles or paprika, if desired.
Important Information
Nutrition Facts (Per Serving)
It is important to consider this information as approximate and not to use it as definitive health advice.
Allergy Information
Please check ingredients for potential allergens and consult a health professional if in doubt.