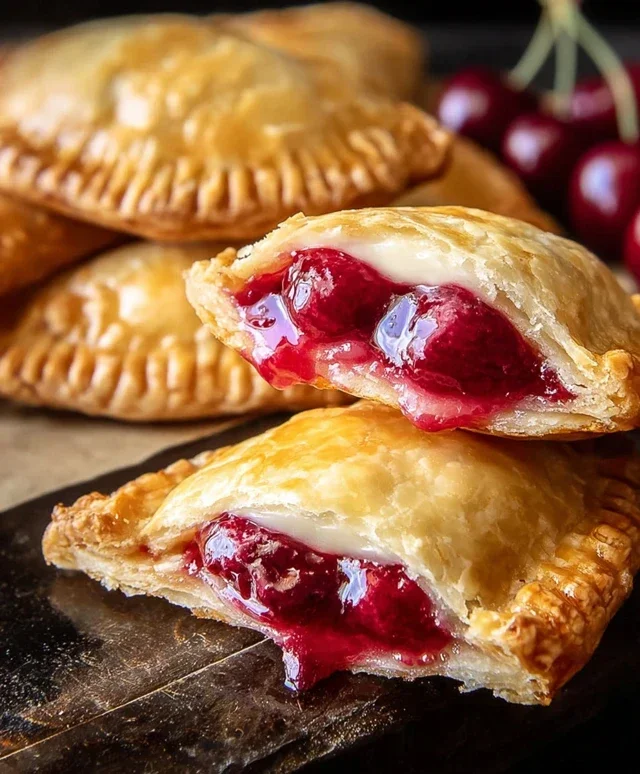
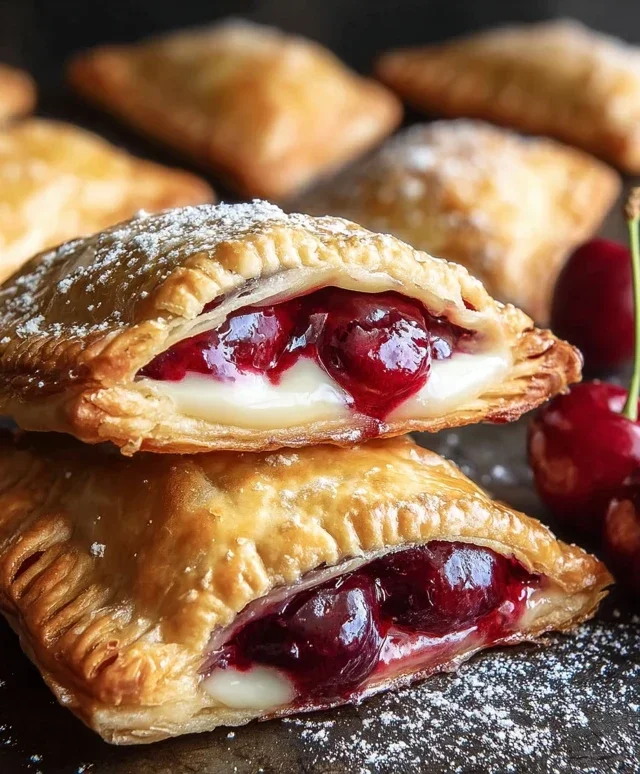
Cherry Cheesecake Hand Pies – Easy Delicious Bites
Cherry Cheesecake Hand Pies are a delightful way to enjoy two beloved desserts in one portable package. Imagin extracte the creamy, tangy goodness of cheesecake meeting the sweet burst of cherries, all encased in a flaky, golden pastry. It’s no wonder these little gems are such a hit! People adore the comforting familiarity of cheesecake, but the idea of it in a convenient hand pie format elevates it to a whole new level of deliciousness. What makes these Cherry Cheesecake Hand Pies truly special is their perfect balance of textures and flavors. The smooth, rich filling contrasts beautifully with the crisp crust, and the tart cherries cut through the sweetness, creating a truly irresistible treat that’s perfect for picnics, parties, or just a delightful afternoon indulgence. I can’t wait for you to try them!
Cherry Cheesecake Hand Pies
There’s something incredibly satisfying about a homemade treat, especially when it combines the creamy goodness of cheesecake with the sweet burst of cherries, all encased in a flaky, golden crust. And when you can enjoy all that goodness in a portable, individual portion? Even better! These Cherry Cheesecake Hand Pies are my go-to for dessert parties, quick snacks, or even a special breakfast treat. They’re surprisingly easy to make, especially with the help of refrigerated pie crust, and the deep-fried finish makes them wonderfully crispy and utterly irresistible. Forget fussy springform pans; these hand pies are all about simple indulgence.
Ingredients:
Instructions:
Preparing the Cheesecake Filling
The heart of our hand pies is a simple, yet delicious, cream cheese filling. Start by ensuring your cream cheese is nice and soft. This makes it much easier to incorporate without lumps. In a medium bowl, combine the softened cream cheese with the 1/4 cup of granulated sugar. Use a whisk or an electric mixer on low speed to blend them together until the mixture is smooth and creamy. Don’t overmix, as we’re not trying to whip a lot of air into it. Once the cream cheese and sugar are well combined, gently fold in the entire 21 oz can of cherry pie filling. The goal here is to distribute the cherries evenly throughout the cream cheese mixture. You want pockets of creamy cheesecake and bursts of sweet cherry goodness in every bite. Set this filling aside while you prepare the pie crusts.
Assembling the Hand Pies
Unroll your package of refrigerated pie crusts onto a lightly floured surface. You’ll find two crusts in a standard package. Carefully separate them. For hand pies, we want to create little pockets of deliciousness. I like to use a round cookie cutter or even a small bowl to cut out circles from each pie crust. Aim for circles that are about 4-5 inches in diameter. This size is perfect for holding a good amount of filling and is easy to handle. You should be able to get several circles from each crust, depending on your chosen size. You can re-roll the scraps once, but be careful not to overwork the dough, as this can make it tough. Once your circles are cut, take one circle and place a heaping tablespoon of the cherry cheesecake filling slightly off-center. Be generous, but not so generous that the filling spills out when you try to seal the edges.
Sealing and Crimping for Deliciousness
Now it’s time to seal these little parcels of joy. Take another pie crust circle and carefully place it on top of the filled circle, aligning the edges. Gently press down around the filling to remove any air pockets. This is crucial for preventing your hand pies from puffing up unevenly or bursting during frying. Once you’ve pressed out the air, use the tines of a fork to crimp the edges of the hand pies. Go all the way around, pressing firmly. This not only creates a beautiful, decorative edge but also ensures that the pies are securely senon-alcoholic aled, keeping that luscious filling safely inside during the frying process. For an extra touch, and to prevent any steam buildup that could cause blowouts, I like to make a small vent or two on the top of each hand pie with the tip of a sharp knife.
The Art of Deep Frying
This is where the magic happens and those golden, crispy textures are achieved. In a large, heavy-bottomed pot or Dutch oven, pour in your vegetable oil. You’ll need enough oil to allow the hand pies to float freely, typically around 3-4 inches deep. Heat the oil over medium-high heat until it reaches about 350°F (175°C). A kitchen thermometer is your best friend here for ensuring the oil is at the correct temperature. If the oil is too cool, the hand pies will absorb too much oil and become greasy. If it’s too hot, they’ll burn on the outside before the filling is heated through. Carefully, and I mean carefully, slide 2-3 hand pies into the hot oil. Don’t overcrowd the pot, as this will lower the oil temperature. Fry them for about 2-3 minutes per side, or until they are beautifully golden brown and puffed up. Use a slotted spoon or spider strainer to gently flip them and ensure even cooking.
Draining and Glazing to Perfection
Once the hand pies are golden and perfectly cooked, carefully remove them from the hot oil using your slotted spoon or spider strainer. Place them on a wire rack set over a baking sheet to drain off any excess oil. This step is essential for achieving that desirable crispiness. While the pies are still warm, it’s time for the finishing touch – a sweet glaze. In a small bowl, whisk together the 1/2 cup of powdered sugar, 1 teaspoon of corn syrup, and 1 tablespoon of water until you have a smooth, drizzle-able glaze. The corn syrup helps to give the glaze a lovely sheen. Drizzle this sweet glaze generously over the warm hand pies. The warmth of the pies will help the glaze set slightly. Let them cool for a few minutes on the wire rack until the glaze has firmed up a bit. They are best enjoyed warm, but they are also delicious at room temperature. Store any leftovers in an airtight container at room temperature for a day or two, though I doubt you’ll have any!
Conclusion:
I hope you’ve enjoyed learning how to make these delightful Cherry Cheesecake Hand Pies! These little pockets of joy are truly a winner. They combine the creamy, tangy goodness of cheesecake with the sweet burst of cherries, all wrapped in a flaky, buttery crust. They are perfect for satisfying your sweet tooth without the commitment of a whole pie, making them ideal for parties, potlucks, or even just a special treat for yourself. I love them because they offer individual portions, are easy to transport, and always impress! For serving, I find they are fantastic warm, perhaps with a dusting of powdered sugar or a dollop of whipped cream. They also hold up wonderfully at room temperature for picnics. Don’t be afraid to get creative with variations! You could try a different berry, like blueberries or raspberries, or even add a touch of almond extract to the cheesecake filling for a different flavor profile. Give these Cherry Cheesecake Hand Pies a try – I promise you won’t regret it!
Frequently Asked Questions:
Can I make these ahead of time?
Yes, you absolutely can! You can prepare the hand pies and refrigerate them for up to 2 days before baking. For longer storage, you can freeze the unbaked hand pies on a baking sheet until firm, then transfer them to a freezer-safe container for up to 1 month. Bake from frozen, adding a few extra minutes to the baking time.
What kind of cherries should I use?
Both fresh and frozen cherries work beautifully for these Cherry Cheesecake Hand Pies. If using frozen cherries, make sure to thaw them and drain off any excess liquid before adding them to the filling to prevent a soggy crust.
Can I use store-bought pie crust?
Absolutely! If you’re short on time, using store-bought refrigerated pie crust is a fantastic shortcut and will still result in delicious hand pies. Just follow the recipe instructions for assembling and baking.
Cherry Cheesecake Hand Pies
Delightful and easy-to-make hand pies filled with a creamy cheesecake and tart cherry mixture, fried to golden perfection.
Ingredients
-
1/4 cup granulated sugar
-
4 oz cream cheese, softened
-
21 oz can cherry pie filling
-
1 package refrigerated pie crust (2 crusts)
-
1/2 cup powdered sugar
-
1 teaspoon corn syrup
-
1 tablespoon water
-
Vegetable oil, for deep frying (about 4-6 cups)
Instructions
-
Step 1
In a medium bowl, beat together the softened cream cheese and granulated sugar until smooth. -
Step 2
Gently fold in the cherry pie filling into the cream cheese mixture. -
Step 3
Unroll the refrigerated pie crusts. Cut out circles using a cookie cutter or a glass. -
Step 4
Spoon about 2 tablespoons of the cherry cheesecake filling onto one half of each crust circle. Fold the other half over and crimp the edges with a fork to seal. -
Step 5
Heat vegetable oil in a deep fryer or large heavy-bottomed pot to 350°F (175°C). -
Step 6
Carefully place hand pies into the hot oil, a few at a time, and fry for 2-3 minutes per side, or until golden brown. Drain on paper towels. -
Step 7
While pies are cooling, whisk together powdered sugar, corn syrup, and water to create a glaze. Drizzle over the cooled hand pies.
Important Information
Nutrition Facts (Per Serving)
It is important to consider this information as approximate and not to use it as definitive health advice.
Allergy Information
Please check ingredients for potential allergens and consult a health professional if in doubt.