Biscoff Cookie Butter Cheesecake Pops-Easy Dessert
Biscoff Cookie Butter Cheesecake Pops are the ultimate indulgence, a delightful fusion of creamy cheesecake and the irresistible spiced sweetness of Biscoff cookies. If you, like me, are completely captivated by that dreamy, spreadable magic of Biscoff cookie butter, then you’re in for a serious treat. These aren’t just your average pops; they’re miniature masterpieces that pack a flavor punch far beyond their adorable size. The genius lies in combining the rich, tangy cheesecake base with swirls and crum extractbles of Biscoff cookie butter, creating layers of pure bliss in every bite. Forget the fuss of a full-sized cheesecake; these Biscoff Cookie Butter Cheesecake Pops are perfectly portioned for maximum enjoyment and minimal mess. Get ready to impress your friends, or simply treat yourself to a moment of pure, unadulterated dessert joy!
Biscoff Cookie Butter Cheesecake Pops
Get ready for a treat that’s out of this world! If you’re a fan of the magical Biscoff cookie butter and the creamy delight of cheesecake, then these Biscoff Cookie Butter Cheesecake Pops are going to be your new obsession. They’re like a miniature, no-bake cheesecake experience, infused with that irresistible spiced cookie flavor and topped with more of that deliciousness. Perfect for parties, a special dessert, or just because you deserve a little indulgence, these pops are surprisingly easy to make and guaranteed to impress. I love how they combine the smooth, rich texture of cheesecake with the crunch and spice of Biscoff cookies in every single bite.
Ingredients:
Let’s Get Popping: The Step-by-Step Guide
This recipe is designed to be straightforward, so even if you’re new to making treats like this, you’ll find it a breeze. The key to success is ensuring your cream cheese is properly softened, which makes for a much smoother filling.
Step 1: Creating the Creamy Cheesecake Base
First things first, let’s get that cheesecake filling ready. In a medium-sized mixing bowl, combine the 8 oz of softened cream cheese and the ½ cup of powdered sugar. It’s really important that your cream cheese is soft – leave it out on the counter for at least an hour, or gently microwave it in short bursts (about 15-20 seconds at a time) until it’s pliable but not melted. This will prevent any lumps and ensure a silky smooth texture. Beat these two ingredients together until they are perfectly combined and fluffy. You can use an electric mixer for this, which will make it super easy, or a sturdy whisk if you’re feeling energetic. Next, stir in the 1 teaspoon of vanilla extract. This adds that classic cheesecake aroma and flavor that complements the Biscoff beautifully.
Step 2: Folding in the Lightness and Spice
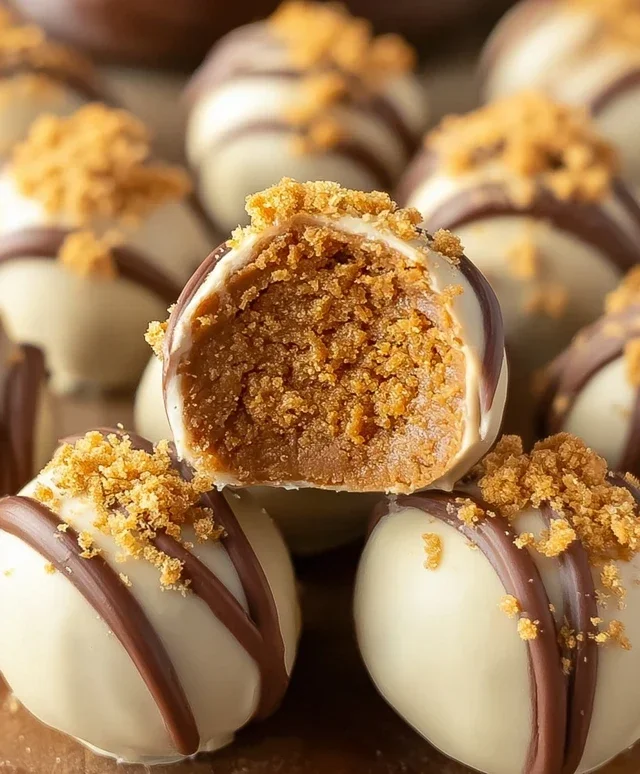
Now, we’re going to lighten up our cheesecake base. Gently fold in the ½ cup of whipped cream (or if you’re using Cool Whip, make sure it’s thawed according to package directions). The goal here is to incorporate it without deflating the whipped cream too much. This will give our pops that airy, melt-in-your-mouth quality that makes cheesecake so irresistible. Once the whipped cream is mostly incorporated, it’s time for the star of the show: the ½ cup of crushed Biscoff cookies. I like to crush my cookies by placing them in a zip-top bag and gently crushing them with a rolling pin, but a food processor works wonderfully too. You want a mix of fine crum extractbs and some slightly larger pieces for texture. Fold these crushed cookies into the cream cheese mixture. This is where the magic of Biscoff really starts to come through.
Step 3: Infusing with Biscoff Cookie Butter Goodness
This is where we take our cheesecake pops from delicious to absolutely divine. In a separate small bowl, gently warm the ½ cup of Biscoff cookie butter. You can do this in the microwave in very short intervals (10-15 seconds) until it’s pourable but not hot. Warming it slightly will make it easier to incorporate into the cheesecake mixture without it seizing up. If your Biscoff cookie butter is already quite soft and spreadable, you might be able to skip the warming step. Add the warmed Biscoff cookie butter to your cream cheese and cookie crum extractb mixture. Stir everything together until it’s just combined. Be careful not to overmix at this stage, as we want to maintain that lovely texture. If the mixture seems a little too stiff for your liking, you can stir in the 2 tablespoons of heavy cream (optional) to achieve a smoother, more pliable consistency. This extra cream is particularly helpful if your cream cheese was a bit firm to begin extract with.
Step 4: Assembling the Pops
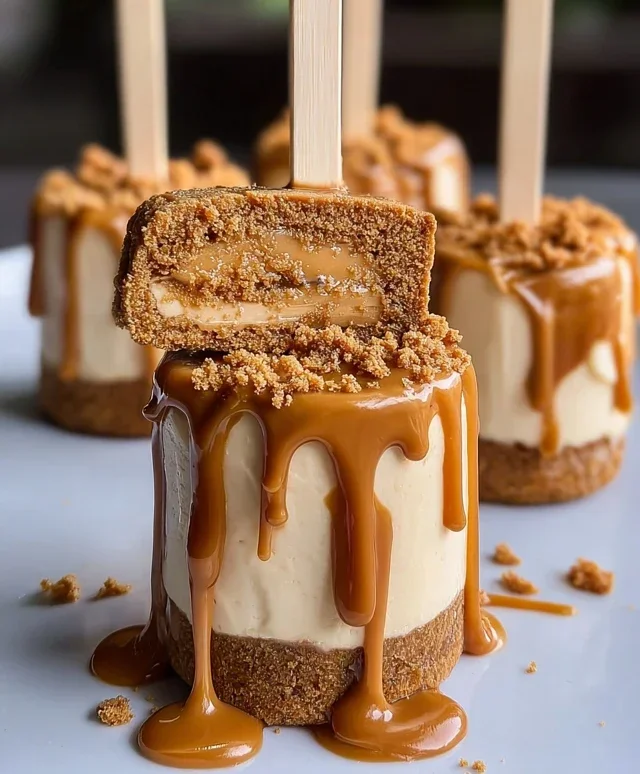
Now for the fun part – assembling the pops! You’ll need a mini muffin tin or a small silicone mold for this. Line the cups with small cupcake liners if you’re using a muffin tin; this makes them easier to remove. Alternatively, a silicone mold designed for popsicles works perfectly. Spoon the Biscoff cheesecake mixture into each mold, filling them about two-thirds full. Don’t overfill, or you’ll have a mess when you try to insert the sticks. Press a whole Biscoff cookie gently into the top of each pop, so it’s partially submerged. Then, carefully insert a popsicle stick into the center of each pop, pushing it down about halfway into the filling. Make sure the sticks are straight and secure.
Step 5: Chilling and Garnishing
Once all your pops are assembled, it’s time for them to firm up. Place the muffin tin or mold in the freezer for at least 2-3 hours, or until the cheesecake pops are completely firm and easy to remove. The freezing process is crucial for them to hold their shape when you take them out. When you’re ready to serve, gently remove the pops from the mold. If you used liners, peel them away. For an extra touch of Biscoff magic, you can dip the bottom of each pop in a little extra melted Biscoff cookie butter and then roll it in the extra crushed Biscoff cookies for garnish. You could also drizzle with melted chocolate or just dust with more cookie crum extractbs. Serve these delightful pops immediately, or keep them in an airtight container in the freezer for a quick and easy treat anytime. Enjoy every single delicious, cookie-butter-filled bite!

Conclusion:
These Biscoff Cookie Butter Cheesecake Pops are an absolute dream! They perfectly combine the creamy, decadent texture of cheesecake with the warm, spiced notes of Biscoff cookie butter, all in a fun, bite-sized package. This recipe is fantastic because it’s surprisingly easy to make, even for begin extractner bakers, and the results are incredibly impressive. The crunchy cookie crust provides a delightful textural contrast, and the smooth, rich filling is utterly irresistible. They’re perfect for parties, special occasions, or simply as a delightful treat to brighten your day. I love serving these chilled, straight from the freezer, for an extra refreshing experience. They’re also wonderfully portable, making them ideal for picnics or potlucks. Don’t be afraid to experiment with variations! You could drizzle them with extra melted Biscoff spread, sprinkle them with chopped Biscoff cookies, or even add a touch of cinnamon to the filling. I genuinely encourage you to give these Biscoff Cookie Butter Cheesecake Pops a try – you won’t regret it!
Frequently Asked Questions:
Can I make these cheesecake pops ahead of time?
Absolutely! These are perfect for making in advance. Once they are frozen solid, you can transfer them to an airtight container and store them in the freezer for up to 2 weeks. This makes them a great option for entertaining or for satisfying a sweet craving whenever it strikes.
What if I don’t have cookie sticks?
No problem at all! You can still create delicious cheesecake bites. Simply omit the cookie sticks and bake the cheesecake mixture in mini muffin liners. You’ll get the same fantastic Biscoff cookie butter flavor in a slightly different, equally delightful format.
How do I prevent the cheesecake from cracking?
While cracking isn’t a major concern for pops since they’re frozen, for traditional cheesecakes, a common tip is to bake in a water bath. However, for these pops, simply ensuring your cream cheese is at room temperature and not over-mixing the batter after adding eggs usually leads to a smooth, crack-free finish, which is ideal for these delightful treats.
Biscoff Cookie Butter Cheesecake Pops
Delicious no-bake cheesecake pops featuring the irresistible flavor of Biscoff cookies and cookie butter, perfect for a sweet treat.
Ingredients
-
8 oz cream cheese, softened
-
½ cup powdered sugar
-
1 teaspoon vanilla extract
-
½ cup whipped cream (or Cool Whip)
-
½ cup crushed Biscoff cookies
-
½ cup Biscoff cookie butter
-
2 tablespoons heavy cream (optional, for thinning)
-
Whole Biscoff cookies
-
Extra crushed Biscoff cookies for garnish
-
Popsicle sticks
Instructions
-
Step 1
In a large bowl, beat the softened cream cheese and powdered sugar until smooth and creamy. -
Step 2
Stir in the vanilla extract and Biscoff cookie butter until well combined. -
Step 3
Gently fold in the whipped cream (or Cool Whip) and crushed Biscoff cookies until just incorporated. If the mixture is too thick to pipe or form, stir in the optional heavy cream, 1 tablespoon at a time. -
Step 4
Line a baking sheet with parchment paper. Spoon or pipe the cheesecake mixture into small balls or desired shapes. Insert a popsicle stick into each ‘pop’. -
Step 5
Place whole Biscoff cookies onto the parchment paper, then press the cheesecake pops onto the cookies to create a base, if desired. Alternatively, simply place the pops on the parchment paper. -
Step 6
Freeze for at least 2-3 hours, or until firm. Before serving, garnish with extra crushed Biscoff cookies.
Important Information
Nutrition Facts (Per Serving)
It is important to consider this information as approximate and not to use it as definitive health advice.
Allergy Information
Please check ingredients for potential allergens and consult a health professional if in doubt.