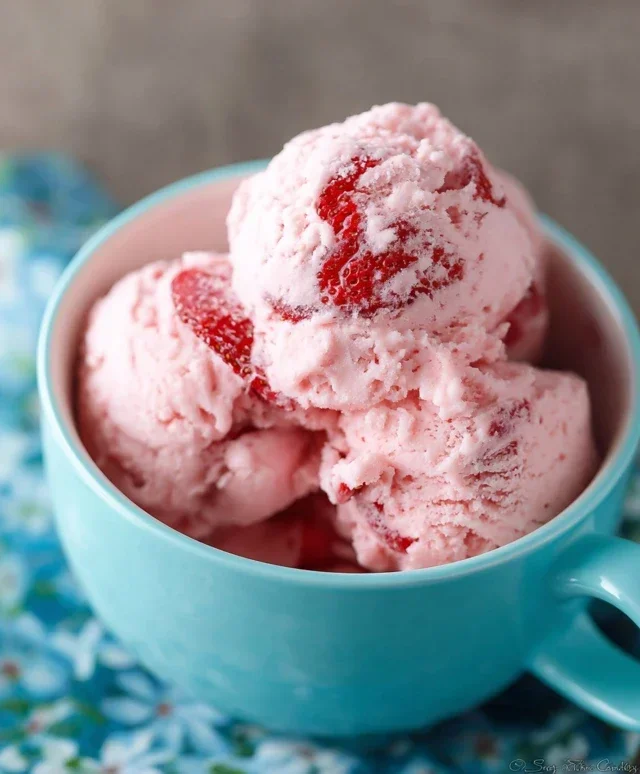
Easy Homemade Strawberry Ice Cream Recipe
Homemade Strawberry Ice Cream is more than just a dessert; it’s a sweet, nostalgic hug in a bowl. There’s a reason why this classic flavor reigns supreme for so many of us. Imagin extracte the pure, unadulterated taste of sun-ripened strawberries, bursting with vibrant flavor, swirled into a creamy, dreamy base. It’s the taste of summer picnics, childhood joy, and those perfect, lazy afternoons. What makes our homemade strawberry ice cream truly special is the ability to control the quality of ingredients – no artificial flavors or excessive sugars here. We get to capture that authentic strawberry essence, a sweetness that’s both delicate and intensely satisfying. Forget the store-bought stuff; when you make strawberry ice cream from scratch, you’re crafting an experience, a moment of pure, unadulterated bliss that’s simply incomparable.
Why You’ll Love This Recipe
It’s unbelievably easy and incredibly rewarding!
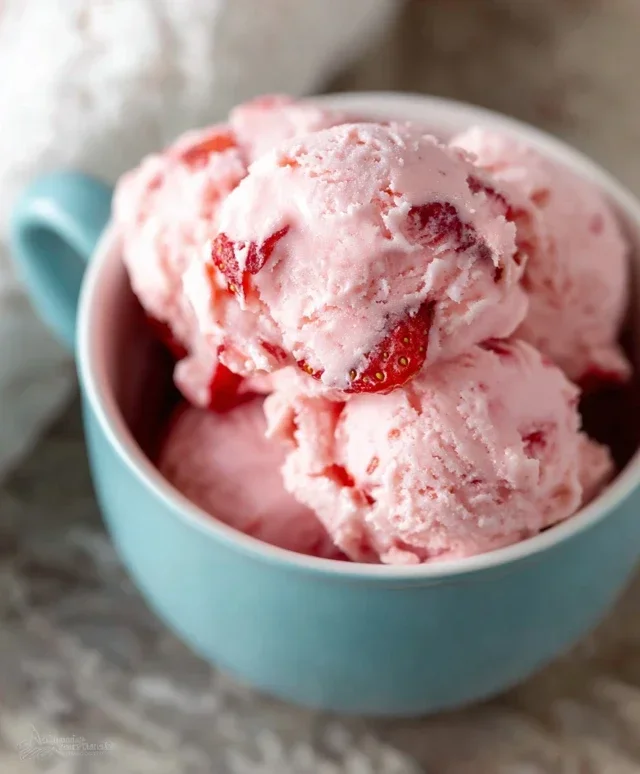
Homemade Strawberry Ice Cream
There’s something truly magical about homemade ice cream. It’s a labor of love, yes, but the reward of that first spoonful of rich, creamy, intensely flavored ice cream is unparalleled. And when that flavor is the sweet, sun-kissed taste of fresh strawberries, well, that’s pure bliss. Forget the bland, overly sweet store-bought versions. This recipe will guide you through creating a homemade strawberry ice cream that’s bursting with natural fruit flavor and a wonderfully smooth texture.
This recipe is designed to be approachable, even if you don’t have an ice cream maker. While an ice cream maker will yield the smoothest results, I’ll also provide tips for achieving a delightful texture without one. The key is to use the freshest, ripest strawberries you can find. They are the star of the show here, so their quality will directly impact the final product.
Ingredients:
Instructions:
Prepare the Strawberry Base: In a medium bowl, combine the diced strawberries with the honey, granulated sugar, and lemon juice. The lemon juice isn’t just for a hint of brightness; it also helps to enhance the natural sweetness and vibrant color of the strawberries. Gently stir everything together. Now, for the magic to begin extract, cover the bowl and let this mixture macerate at room temperature for at least 30 minutes, or even up to an hour. This process, where the fruit sits with the sugar and honey, allows the strawberries to release their delicious juices, creating a syrupy, intensely flavored concoction. You’ll notice the strawberries softening and the liquid pooling at the bottom – this is exactly what we want! This step is crucial for maximizing the strawberry flavor in your ice cream. After macerating, I like to give it a good stir to ensure all the sugar has dissolved into the released juices.
Blend and Strain for Smoothness: Once the strawberries have macerated and released their juices, it’s time to create a smooth strawberry puree. You can do this using an immersion blender directly in the bowl, or transfer the mixture to a regular blender. Blend until the strawberries are completely smooth. For the absolute creamiest ice cream, I highly recommend straining this puree through a fine-mesh sieve set over another bowl. Gently press the solids with the back of a spoon to extract as much liquid as possible. Discard the seeds and pulp left in the sieve. This straining step is what removes those tiny strawberry seeds, which can sometimes create an unpleasant texture in ice cream, ensuring a silky-smooth finish. This gives us a pure strawberry essence to work with.
Create the Ice Cream Base: In a separate, large bowl, combine the heavy whipping cream, half and half, and vanilla extract. Whisk these dairy ingredients together until they are well combined. Now, pour your strained strawberry puree into this cream mixture. Gently whisk everything together until it’s fully incorporated. You should have a beautiful pnon-alcoholic ale pink liquid that smells absolutely divine. Take a moment to taste this mixture – it should be sweet and have a prominent strawberry flavor. Remember, the sweetness will be slightly less pronounced once the ice cream freezes, so don’t be afraid if it tastes a little sweeter than you might prefer at this stage. This is your creamy, dreamy ice cream base, ready for the next step.
Churning the Ice Cream (With an Ice Cream Maker): If you have an ice cream maker, this is where it shines. Make sure your ice cream maker’s bowl is thoroughly frozen according to the manufacturer’s instructions (this usually takes at least 24 hours). Once your bowl is ready, pour the strawberry-cream mixture into the frozen bowl and churn according to your machine’s instructions. This typically takes about 20-30 minutes. The ice cream will start to thicken and take on a soft-serve consistency. Don’t over-churn, as this can sometimes lead to a less desirable texture.
Freezing the Ice Cream (Without an Ice Cream Maker): No ice cream maker? No problem! Pour your strawberry-cream mixture into a shallow, freezer-safe container. Place it in the freezer. Now, here’s the crucial part for achieving a decent texture without churning: every 30-45 minutes for the first 3-4 hours, remove the container from the freezer and vigorously whisk the mixture. Use a fork or a whisk to break up any ice crystals that are forming, especially around the edges. You want to incorporate air and prevent large ice formations. This process mimics the churning action of an ice cream maker. Continue this for about 3-4 hours, or until the ice cream is firm but still scoopable. It won’t be exactly as smooth as machine-churned, but it will be wonderfully delicious and satisfyingly creamy.
Ripening for Ultimate Creaminess: Whichever method you used to freeze your ice cream, the final step is to allow it to “ripen” or harden in the freezer. Once your ice cream has reached a firm but scoopable consistency (either directly from the ice cream maker or after your manual freezing process), transfer it to an airtight container. Press a piece of parchment paper or plastic wrap directly onto the surface of the ice cream to prevent ice crystals from forming on top. Then, seal the container tightly. Freeze for at least 4-6 hours, or preferably overnight. This period allows the ice cream to firm up completely and for the flavors to meld and deepen. The ripening process is essential for achieving that perfect, scoopable ice cream texture. When it’s ready, let it sit at room temperature for a few minutes before scooping to ensure optimal creaminess. Enjoy your homemade strawberry masterpiece!
Conclusion:
I hope you’re as excited as I am to dive into this incredibly rewarding homemade strawberry ice cream recipe! This recipe truly shines because it lets the natural sweetness and vibrant flavor of fresh strawberries take center stage. Forget artificial flavors and preservatives; you’ll be amazed at how simple it is to create a creamy, luscious ice cream right in your own kitchen. It’s the perfect way to capture the essence of summer and enjoy a truly artisanal treat. This delightful homemade strawberry ice cream is sure to become a family favorite!
Serving this luscious ice cream is a joy. It’s absolutely divine on its own, but also pairs beautifully with warm brownies, a slice of angel food cake, or even a simple drizzle of balsamic glaze for a sophisticated twist. Don’t be afraid to get creative with variations! You could add a swirl of dark chocolate, a sprinkle of fresh mint, or even a dash of lemon zest for a zesty kick. I highly encourage you to give this recipe a try; the satisfaction of creating such a delicious dessert from scratch is unparalleled. Happy churning!
Frequently Asked Questions:
Can I use frozen strawberries instead of fresh?
Yes, you absolutely can! If using frozen strawberries, thaw them completely and drain off any excess liquid before pureeing. You might need to slightly adjust the sugar depending on how sweet the frozen berries are.
What if I don’t have an ice cream maker?
No problem at all! While an ice cream maker makes it easier, you can still achieve a wonderful texture by using the no-churn method. Pour the mixture into a freezer-safe container and freeze. Every 30-45 minutes, stir the mixture vigorously with a fork or whisk to break up ice crystals. Repeat this for about 3-4 hours until the ice cream is firm and scoopable.
How long will the homemade strawberry ice cream last?
Stored properly in an airtight container in the freezer, your homemade strawberry ice cream should be best enjoyed within 1-2 weeks for optimal flavor and texture. Freezing can sometimes lead to ice crystals forming over longer periods.
Homemade Strawberry Ice Cream
A simple and delicious homemade strawberry ice cream recipe using fresh ingredients. No ice cream maker required!
Ingredients
-
1 1/2 cups strawberries, hulled and diced
-
2 Tbsp honey
-
1/2 cup granulated sugar
-
1 tsp lemon juice
-
1 cup heavy whipping cream
-
1/2 cup half and half
-
1 tsp vanilla extract
Instructions
-
Step 1
In a bowl, combine the diced strawberries, honey, granulated sugar, and lemon juice. Stir well and let sit for about 15-20 minutes, allowing the strawberries to macerate. -
Step 2
Mash the macerated strawberries with a fork or potato masher until mostly smooth, leaving some small chunks for texture. -
Step 3
In a separate bowl, whisk together the heavy whipping cream, half and half, and vanilla extract until well combined. -
Step 4
Gently fold the mashed strawberry mixture into the cream mixture until evenly distributed. -
Step 5
Pour the mixture into a shallow, freezer-safe container (like a loaf pan or plastic container). Cover tightly with plastic wrap, ensuring the wrap touches the surface of the ice cream to prevent ice crystals. -
Step 6
Freeze for at least 4-6 hours, or until firm. Stir every hour for the first 3 hours to achieve a smoother consistency. If you skip the stirring, it will be more of a frozen sorbet. -
Step 7
Before serving, let the ice cream sit at room temperature for 5-10 minutes to soften slightly.
Important Information
Nutrition Facts (Per Serving)
It is important to consider this information as approximate and not to use it as definitive health advice.
Allergy Information
Please check ingredients for potential allergens and consult a health professional if in doubt.