Easy Bunny Cake Recipe- Simple & Cute Dessert
Easy Bunny Cake Recipe: Get ready to hop into springtime fun with this incredibly simple yet utterly charming Easy Bunny Cake Recipe! Who can resist the allure of a sweet, fluffy bunny made from cake? It’s a classic for a reason, bringin extractg smiles to faces of all ages, especially during Easter celebrations or any time you need a dose of whimsical delight. This isn’t just any cake; it’s a delightful centerpiece that feels special without demanding hours in the kitchen. We love it because it’s forgiving, fun to decorate, and always a crowd-pleaser. What truly makes this Easy Bunny Cake Recipe special is its approachable nature. You don’t need to be a master baker to achieve adorable results, making it the perfect project for families to create together and forge delicious memories.
Easy Bunny Cake Recipe
Get ready to hop into springtime fun with this absolutely adorable and surprisingly simple Bunny Cake recipe! Perfect for Easter celebrations, birthdays, or just because, this cake is sure to bring smiles to everyone’s faces. We’re going to transform two simple round cake layers into a charming bunny that’s almost too cute to eat. Don’t worry if you’re not a seasoned baker; this recipe is designed for ease and maximum impact. Let’s gather our supplies and get baking!
Ingredients:
Getting Started: Assembling Your Bunny
Before we dive into decorating, ensure your cake layers are completely cooled. Warm cakes and frosting are a recipe for a melty mess! If your cake layers have domed significantly during baking, you can gently level them with a serrated knife for a flatter surface. This will make stacking and frosting much easier and give your bunny a more polished look.
Step 1: The Bunny Body Base
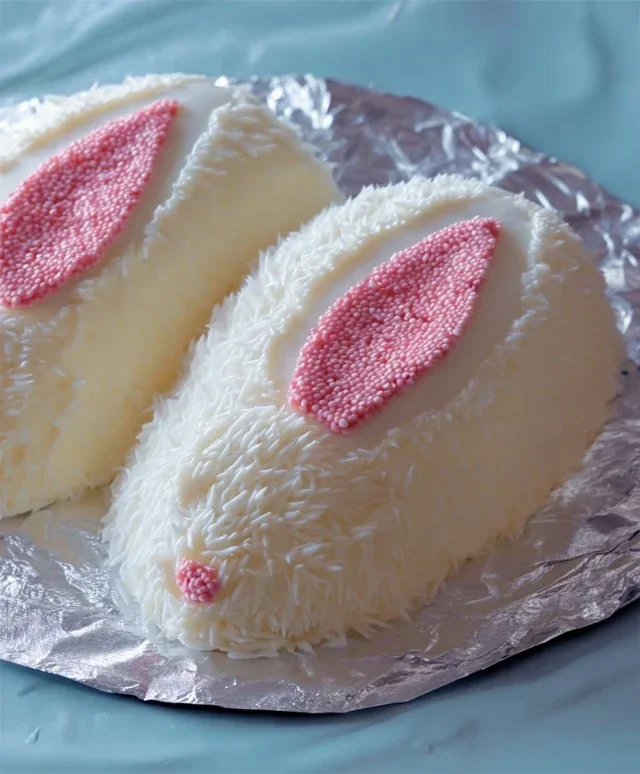
Place one cooled cake layer on your serving platter or cake board. This will be the main body of your bunny. Generously apply a layer of white frosting to the top of this cake. Don’t be shy with the frosting; it acts as the glue for our next layer and adds a delicious sweetness. Carefully place the second cake layer on top of the frosted first layer. Now, you’ll want to frost the entire outside of the stacked cake with white frosting. Use an offset spatula or a butter knife to spread a smooth, even coating. For a fluffy bunny look, you can aim for a slightly textured finish rather than a perfectly smooth one. This will be the base for our bunny’s fur.
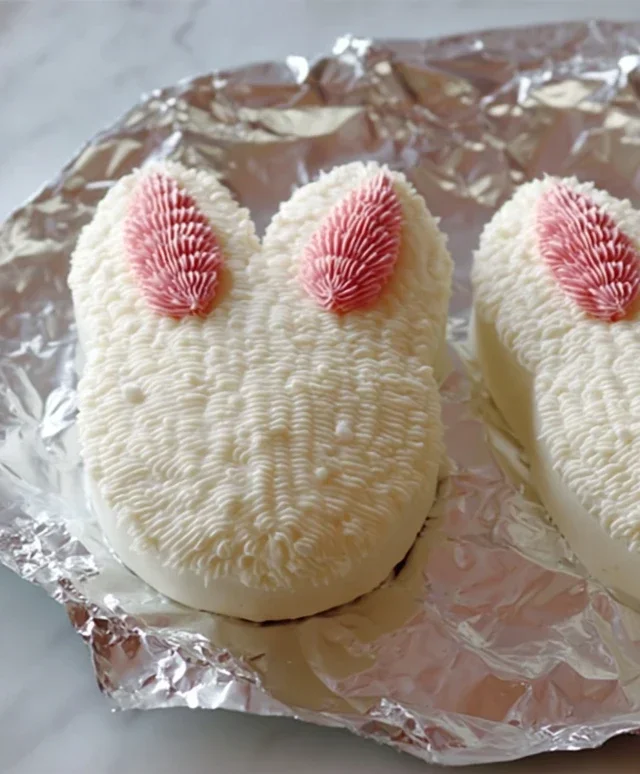
Step 2: Creating the Bunny Ears
This is where the magic starts to happen! For the ears, you have a couple of options. The easiest way is to use some of your prepared white frosting and two piping bags. Fill one piping bag with white frosting fitted with a star tip or grass tip. Pipe two long, oval-shaped “ears” onto a piece of parchment paper or directly onto a small plate that you can later place on your cake. Make them slightly curved, as if they’re perked up. Alternatively, if you have two small crescent rolls or similar-shaped cookies, you could lightly frost them and attach them. However, for this recipe, we’re focusing on frosting-based ears for a cohesive look. Allow these piped ears to firm up slightly in the refrigerator for about 15-20 minutes. This will make them easier to handle.
Step 3: Adding the Pink Inner Ears and Attaching
Once your white frosting ears have firmed up a bit, it’s time to add the adorable pink inner ears. Take your pink frosting and a piping bag fitted with a small round tip. Carefully pipe a slightly smaller, inner ear shape onto each of your white frosting ears. Think of it like coloring in a smaller oval inside the larger one. Once decorated, gently peel your white frosting ears off the parchment paper and carefully position them on top of your cake. You can gently press the base of the ear into the white frosting on the cake to help secure them. If you opted for the cookie method, simply frost the cookies with pink frosting.
Step 4: The Bunny Face Details
Now for the face! Take your chocolate icing or melted chocolate. Fit a piping bag with a very small round tip. Gently pipe two small circles or ovals for the eyes. You can add tiny white dots to the eyes for a highlight, giving them a more lifelike appearance. For the nose, pipe a slightly larger, upside-down triangle or a small heart shape using the pink frosting. If you like, you can add a little more pink frosting to the cheeks for a rosy glow.
Step 5: Whiskers and Finishing Touches
With the same chocolate icing and small piping tip, carefully pipe three delicate whiskers extending from each side of the bunny’s nose. Keep them thin and elegant. Finally, let’s add some playful decorations! Arrange a few jellybeans or colorful round candies around the base of the cake or strategically placed on top, like a little pile of Easter treats. You can also use some of the white frosting with the star or grass tip to add a bit more fluffy texture around the cake, especially where the ears meet the body, to help blend them in and enhance the furry effect.
And there you have it – your very own Easy Bunny Cake! This delightful creation is a testament to how simple ingredients and a little bit of creativity can result in something truly special. Enjoy the process, have fun with the decorating, and most importantly, savor every delicious bite of your homemade bunny masterpiece!
Conclusion:
And there you have it – our incredibly simple and utterly adorable Easy Bunny Cake Recipe! We’ve crafted this recipe to be a joy to make, even for begin extractners, ensuring that your Easter celebrations are filled with a touch of homemade magic. Its simplicity means less time stressing in the kitchen and more time enjoying precious moments with loved ones. The fluffy cake, delightful frosting, and charming bunny design are sure to be a hit with everyone, from the youngest guests to the most discerning adult palates.
Serve this delightful bunny cake as the centerpiece of your Easter brunch or as a sweet treat for an afternoon tea. It pairs wonderfully with fresh berries, a dollop of whipped cream, or even a scoop of vanilla ice cream. Feeling adventurous? You can easily customize this recipe! Try adding a hint of lemon zest to the batter for a brighter flavor, or experiment with different colored frostings to create a whole family of bunnies. You could even add sprinkles for extra sparkle! I truly encourage you to give this Easy Bunny Cake Recipe a try. It’s a rewarding and fun baking experience that will bring smiles all around.
Frequently Asked Questions:
Can I make this cake ahead of time?
Absolutely! You can bake the cake layers a day in advance and store them tightly wrapped at room temperature. The frosting can also be made ahead and refrigerated; just bring it back to room temperature and whisk it briefly before decorating.
What if I don’t have a bunny-shaped cake pan?
No worries! You can bake this cake in a standard round or loaf pan and then shape it yourself. Cut and arrange the pieces to form a bunny silhouette, or simply frost a regular cake and use round cookies for the ears and tail.
How long does the decorated cake stay fresh?
Once decorated, the bunny cake will stay fresh for about 2-3 days when stored in an airtight container at room temperature, or in the refrigerator if your frosting contains cream cheese or other perishable ingredients.
Easy Bunny Cake Recipe
A simple and fun cake decorated to look like a bunny, perfect for Easter or any celebration.
Ingredients
-
Two round cake layers (use one cake mix or your favorite homemade recipe)
-
White frosting (ready-made or your favorite homemade recipe)
-
Pink frosting (strawberry is commonly available ready-made and comes pink)
-
Chocolate icing or melted chocolate for details
-
Jellybeans or colorful round candies
-
Piping bags
Instructions
-
Step 1
Bake and cool two round cake layers according to your chosen recipe. -
Step 2
Place one cake layer on your serving platter. This will be the bunny’s body. -
Step 3
Cut the second cake layer in half. Place the two halves on top of the first layer, angled outwards, to form the bunny’s ears. -
Step 4
Crumb coat the entire cake with white frosting, then apply a thicker, smooth layer of white frosting. -
Step 5
Using pink frosting in a piping bag, pipe two ovals on the face area of the cake to represent the bunny’s nose and inner ears. -
Step 6
Use chocolate icing or melted chocolate with a piping bag to draw eyes and a mouth for the bunny. -
Step 7
Decorate the ears and body with jellybeans or colorful round candies.
Important Information
Nutrition Facts (Per Serving)
It is important to consider this information as approximate and not to use it as definitive health advice.
Allergy Information
Please check ingredients for potential allergens and consult a health professional if in doubt.