Best Banana Pudding Recipe – Creamy & Delicious
Banana pudding is more than just a dessert; it’s a nostalgic hug in a bowl, a creamy, dreamy delight that conjures up memories of childhood kitchens and Sunday dinners. There’s a reason this classic comfort food holds such a special place in our hearts and on our tables. What makes banana pudding so universally adored? It’s that perfect symphony of textures and flavors: the velvety smooth custard, the tender, sweet slices of ripe banana, and the satisfying crunch of delicate vanilla wafers. It’s simple, unpretentious, yet utterly divine. This isn’t just any banana pudding recipe; this is the one that will become your go-to, the recipe you’ll be asked to bring to every potluck. Get ready to create a banana pudding that’s so good, it’ll have everyone asking for seconds before they’ve even finished their first spoonful.

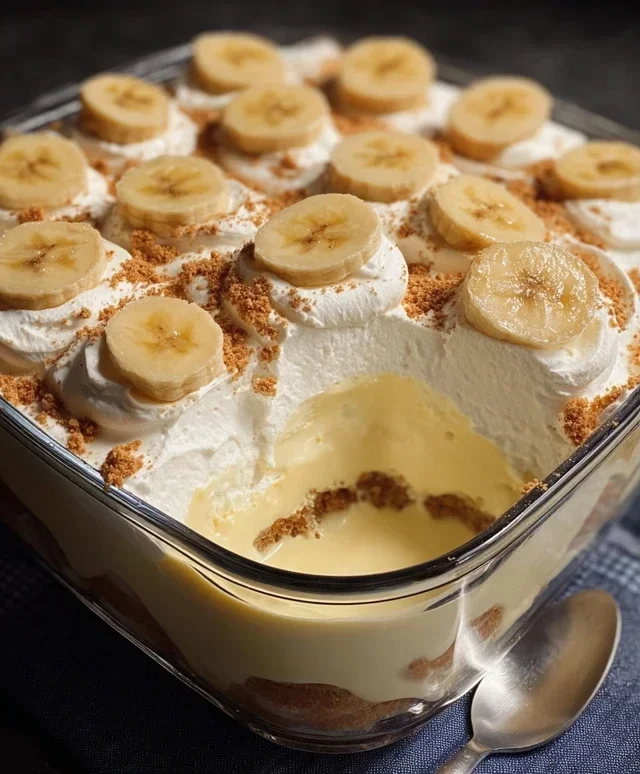
Banana Pudding
There are some desserts that just scream comfort, and banana pudding is undeniably one of them. It’s a classic for a reason: layers of creamy vanilla custard, sweet, ripe bananas, and crunchy vanilla wafers create a symphony of textures and flavors that’s simply irresistible. This recipe is a shortcut to that classic taste, using instant pudding for speed and ease, but without sacrificing any of the homemade deliciousness. It’s perfect for potlucks, family gatherings, or just when you need a sweet treat to brighten your day. Let’s get started on this delightful dessert that’s incredibly easy to whip up!
Ingredients:
Preparation and Mixing
The first step to achieving that perfect creamy base is to combine the instant pudding with the milk. Make sure your milk is nice and cold; this is crucial for the pudding to set up correctly. In a medium-sized bowl, whisk together the instant vanilla pudding mix and the 2 cups of cold milk. Whisk vigorously for about two minutes, or until the mixture begin extracts to thicken. You’ll notice it transforming from a liquid to a luscious, pudding-like consistency. Don’t overmix, but ensure there are no dry pockets of pudding powder left. This initial thickening is the foundation of our creamy layers.
Next, we’ll incorporate the sweetened condensed milk and the extra splash of vanilla. To the thickened pudding mixture, add the entire 14 oz can of sweetened condensed milk. This adds a wonderful richness and a touch more sweetness that complements the vanilla pudding beautifully. Stir in the 1 teaspoon of vanilla extract to enhance the overall vanilla flavor profile. Stir everything together until it’s completely smooth and homogenous. Taste a tiny bit if you’re curious – it should already be tasting wonderfully sweet and creamy.
Now it’s time to fold in the lightness. Gently add the thawed 8 oz tub of whipped topping to the pudding mixture. Use a spatula to carefully fold the whipped topping into the pudding. The goal here is to incorporate the whipped topping without deflating it too much, as this is what will give our banana pudding its airy, cloud-like texture. Fold until just combined, ensuring no streaks of white whipped topping remain. Be patient and gentle with this step; you want to maintain as much airiness as possible. This mixture will become your luscious, creamy layer.
Assembling Your Masterpiece
Once your creamy filling is ready, it’s time to assemble this delightful dessert. Grab your serving dish. A 9×13 inch baking dish is ideal, but you can also make individual servings in small bowls or jars. The layering is where the magic happens! Start by spreading a thin layer of your creamy pudding mixture on the bottom of your dish. This first layer helps to keep the bottom vanilla wafers from becoming too soggy too quickly.
Now, arrange a single layer of vanilla wafers over the pudding. Try to cover as much of the surface as possible. Don’t worry if there are small gaps; the pudding will fill them. Next, arrange a layer of your sliced ripe bananas over the vanilla wafers. Aim for a nice, even layer. The ripeness of your bananas is key here – they should be sweet and slightly soft, but not overly mushy.
Continue layering: spread another generous layer of your creamy pudding mixture over the bananas. Then, add another layer of vanilla wafers, followed by another layer of sliced bananas. You can repeat this layering process depending on the depth of your dish and how many bananas you have. Typically, two to three layers of each component work beautifully. The final top layer should be the creamy pudding mixture, ensuring all the ingredients are well covered.
Chill and Serve
This banana pudding needs a little time to chill and for the flavors to meld together. Cover your assembled pudding tightly with plastic wrap, pressing it directly onto the surface of the pudding to prevent a skin from forming. Refrigerate for at least 4 hours, but overnight is even better. This chilling time allows the vanilla wafers to soften slightly and absorb some of the creamy pudding, creating that signature delightful texture. It also gives the flavors a chance to deepen and harmonize.
When you’re ready to serve, you can garnish your banana pudding with a few extra vanilla wafers crum extractbled on top, or even some extra banana slices if you like. Spoon generous portions into bowls and enjoy the delightful combination of creamy, sweet, and soft. This classic banana pudding is sure to be a hit with everyone who tries it! It’s a truly satisfying dessert that’s both easy to make and incredibly rewarding to eat.
Conclusion:
I hope you’re as excited about this classic Banana Pudding recipe as I am! This dessert truly stands the test of time because it’s wonderfully simple, incredibly comforting, and bursts with sweet, creamy, banana goodness. The magic lies in the perfect balance of soft, ripe bananas, rich vanilla custard, and the delightful crunch of vanilla wafers. It’s a dessert that evokes childhood memories and brings smiles to everyone’s faces, making it an ideal treat for family gatherings, potlucks, or just a cozy night in. I highly encourage you to give this recipe a try; you won’t be disappointed!
For serving, this Banana Pudding is fantastic chilled, allowing the flavors to meld beautifully. I love topping it with a dollop of whipped cream and a sprinkle of crushed vanilla wafers for an extra touch of indulgence. Don’t be afraid to experiment with variations! You can add a hint of cinnamon to the custard for warmth, or even incorporate a layer of caramel sauce for a decadent twist. For an even richer flavor, consider using a mix of milk and heavy cream in your custard base.
Frequently Asked Questions about Banana Pudding:
Q: Can I make this Banana Pudding ahead of time?
Absolutely! Banana Pudding is actually best made a few hours in advance, or even the day before. This allows the vanilla wafers to soften slightly and absorb the delicious custard, creating that signature pudding texture. Just be sure to store it tightly covered in the refrigerator.
Q: My custard is lumpy. What went wrong?
Lumps in custard often happen when the eggs cook too quickly or unevenly. The key is to temper the eggs by gradually whisking a small amount of the hot milk mixture into the beaten eggs before adding them back to the pot. Also, continuous whisking over low to medium heat is crucial, and straining the custard through a fine-mesh sieve can help remove any small lumps.
Q: What kind of bananas should I use?
For the best flavor and texture in your Banana Pudding, use ripe but not overly mushy bananas. Yellow bananas with a few brown spots are ideal – they offer the perfect sweetness and soft texture without being too soft or starchy. Avoid green bananas, as they will be too firm and less sweet.
Classic Banana Pudding
A simple and delicious layered banana pudding made with instant vanilla pudding, sweet condensed milk, fresh bananas, and vanilla wafers.
Ingredients
-
1 (3.4 oz) box instant vanilla pudding mix
-
2 cups cold milk
-
1 (14 oz) can sweetened condensed milk
-
1 tsp vanilla extract
-
1 (8 oz) tub whipped topping, thawed
-
4-5 ripe bananas, sliced
-
1 (11 oz) box vanilla wafers
Instructions
-
Step 1
In a large bowl, whisk together the instant vanilla pudding mix, cold milk, sweetened condensed milk, and vanilla extract until well combined and smooth. Let it sit for 5 minutes to thicken. -
Step 2
Gently fold in the thawed whipped topping until no streaks remain. This will create a light and airy pudding base. -
Step 3
Begin layering the pudding in a serving dish (such as a trifle bowl or an 8×8 inch baking dish). Start with a layer of vanilla wafers. -
Step 4
Add a layer of sliced bananas over the vanilla wafers. -
Step 5
Spoon a generous amount of the prepared pudding mixture over the bananas. -
Step 6
Repeat the layering process: vanilla wafers, sliced bananas, and pudding, until all ingredients are used, finishing with a layer of pudding. -
Step 7
Cover the dish and refrigerate for at least 2 hours (or preferably longer) to allow the flavors to meld and the wafers to soften.
Important Information
Nutrition Facts (Per Serving)
It is important to consider this information as approximate and not to use it as definitive health advice.
Allergy Information
Please check ingredients for potential allergens and consult a health professional if in doubt.