Soft Chewy Lemon Cookies – Easy Recipe
Soft & Chewy Lemon Cookies are an absolute ray of sunshine in cookie form, aren’t they? There’s something undeniably delightful about a cookie that perfectly balances a tender, yielding texture with a bright, zesty flavor. We all crave that satisfying bite that’s not too crisp, not too cakey, but just right – and that’s precisely what makes these Soft & Chewy Lemon Cookies so universally loved. They’re the perfect treat to brighten your afternoon, to share with friends, or to simply enjoy with a warm cup of tea. What sets these apart is the incredible depth of lemon flavor we achieve, without any hint of bitterness, all wrapped up in a cookie that stays wonderfully soft and chewy for days. Get ready to discover your new favorite lemon cookie!
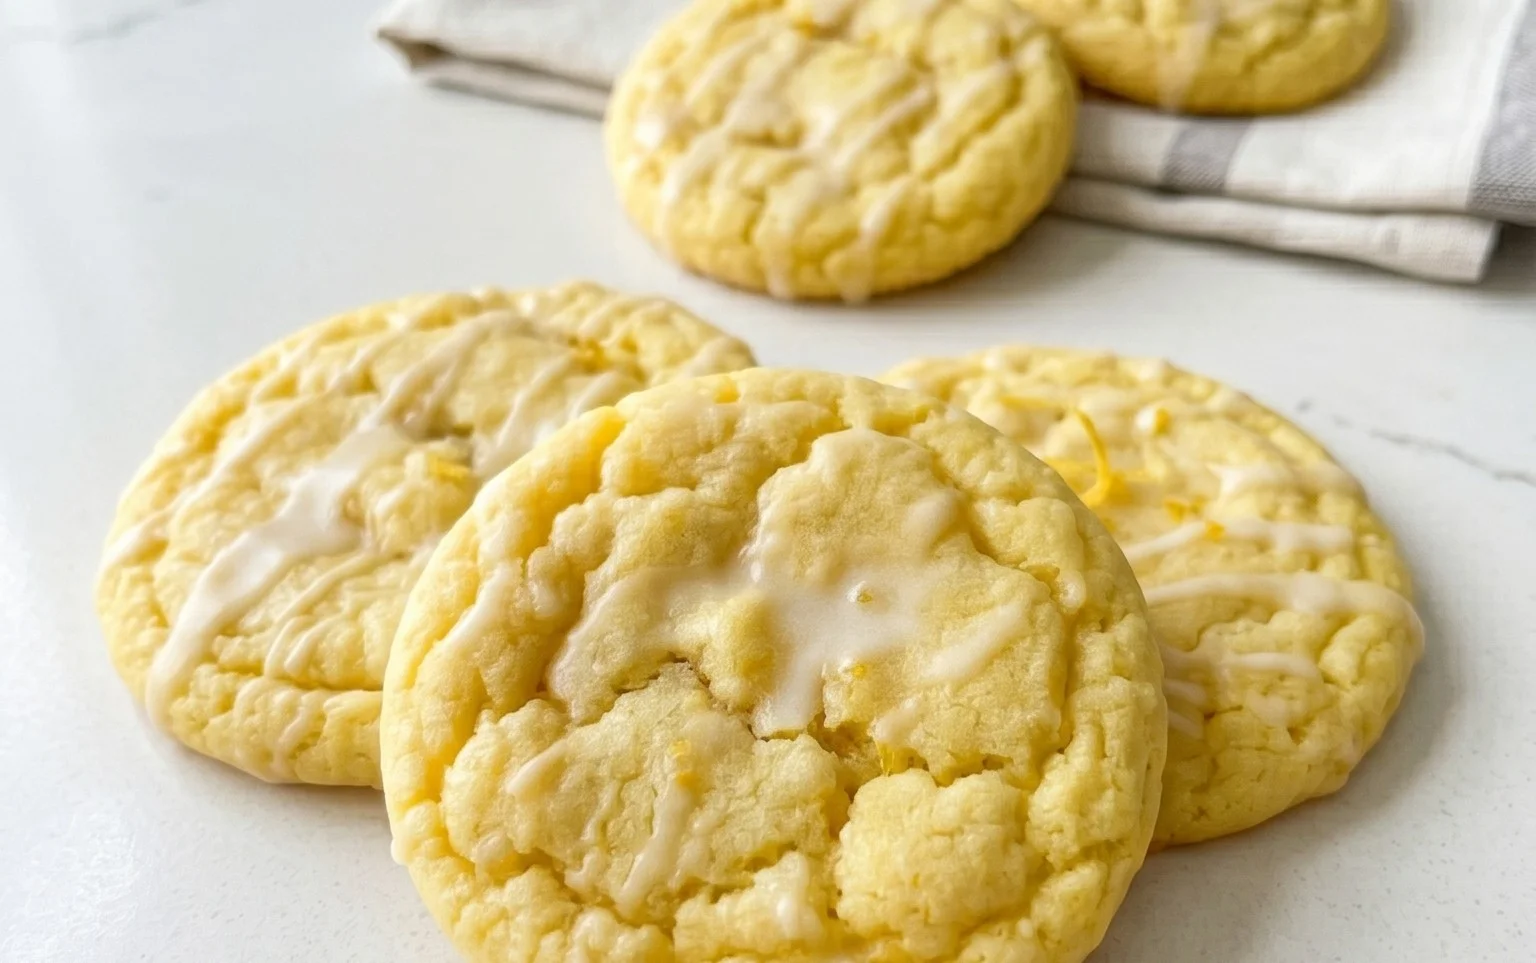
Soft & Chewy Lemon Cookies
There’s something truly magical about a cookie that strikes the perfect balance between tender and chewy, with a bright, zesty flavor that dances on your tongue. Today, we’re diving into the delightful world of Soft & Chewy Lemon Cookies. These aren’t your average lemon cookies; they are a sunshine-filled treat designed to be wonderfully soft, delightfully chewy, and bursting with vibrant lemon flavor. Perfect for an afternoon pick-me-up, a bright addition to a dessert table, or simply a way to brighten your day, these cookies are surprisingly easy to make and incredibly rewarding. The secret lies in a few key ingredients and techniques that ensure that coveted soft and chewy texture. Get ready to fill your kitchen with the irresistible aroma of fresh lemon and warm butter!
Ingredients:
Cooking Instructions
Let’s get baking! The journey to perfect soft and chewy lemon cookies begin extracts with properly creaming our butter and sugar. This step is crucial for incorporating air into the dough, which contributes to the cookie’s texture.
1. Creaming the Butter and Sugar: In a large mixing bowl, combine the 1 ½ cups of granulated sugar with the ¾ cup of softened unsalted butter. If your butter isn’t quite soft enough, you can gently warm it for a few seconds in the microwave, but be careful not to melt it. You want it pliable, like a paste. Using an electric mixer (a stand mixer with the paddle attachment or a hand mixer), beat the butter and sugar together on medium-high speed for about 3 to 5 minutes. You’re looking for a pnon-alcoholic ale, fluffy mixture. This process is called “creaming” and it’s essential for creating light and tender cookies. Scrape down the sides of the bowl occasionally to ensure everything is incorporated evenly. Once you achieve that fluffy, pnon-alcoholic ale yellow texture, it’s time to add the flavor.
2. Adding the Flavor and Eggs: Now, let’s infuse our cookies with that wonderful lemon essence. Add the 1 tablespoon of lemon zest to the creamed butter and sugar mixture. The zest contains the essential oils of the lemon peel, providing a potent and bright lemon flavor without adding excess liquid. Next, incorporate the 1 large egg and the 1 large egg yolk. It’s important that these eggs are at room temperature; cold eggs can cause the butter to seize up, resulting in a less smooth dough. Beat them in one at a time, mixing well after each addition until fully combined. Finally, add the 2 teaspoons of lemon extract. If you prefer a more nuanced flavor profile, you can substitute ½ teaspoon of the lemon extract with ½ teaspoon of vanilla extract for a hint of warmth. Mix until just combined.
3. Whisking the Dry Ingredients: In a separate medium-sized bowl, whisk together the dry ingredients. This is where we’ll combine the 3 cups of all-purpose flour, 1 teaspoon of baking soda, 1 teaspoon of cornstarch, and ¾ teaspoon of salt. Whisking the dry ingredients together ensures that the leavening agents (baking soda) and salt are evenly distributed throughout the flour. This prevents pockets of saltiness or a lopsided rise in your cookies. The cornstarch is an unsung hero here; it helps to tenderize the cookie and contributes to that soft, melt-in-your-mouth texture. Once whisked, gradually add the dry ingredients to the wet ingredients in the large mixing bowl.
4. Combining Wet and Dry and Adding Lemon Juice: Mix the dry ingredients into the wet ingredients on low speed until just combined. Be careful not to overmix the dough at this stage. Overmixing develops the gluten in the flour, which can lead to tough cookies. You want to mix until you no longer see streaks of dry flour. Once the dough is almost fully combined, add the 2 tablespoons of lemon juice. The lemon juice adds another layer of citrusy flavor and also helps to activate the baking soda, contributing to the cookie’s lift and chewy texture. Mix on low speed for just a few more seconds until the dough comes together. The dough will be soft and slightly sticky, which is exactly what we want for chewy cookies.
5. Chilling and Shaping the Dough: This is a critical step for achieving the perfect soft and chewy texture. Cover the bowl of cookie dough tightly with plastic wrap and refrigerate for at least 1 hour, or preferably 2 hours. Chilling the dough allows the fats to solidify, which prevents the cookies from spreading too much in the oven. It also allows the flavors to meld and deepen. Once chilled, scoop the dough into balls using a cookie scoop or two spoons, about 1 ½ inches in diameter. Roll each ball into the ¼ cup of granulated sugar that we set aside for rolling and garnishing. The sugar coating will create a slightly crisp exterior and a beautiful sparkly finish. Arrange the sugar-coated dough balls on baking sheets lined with parchment paper, leaving about 2 inches between them to allow for spreading.
6. Baking to Perfection: Preheat your oven to 375°F (190°C). Bake the cookies for 9 to 12 minutes, or until the edges are lightly golden brown and the centers still look slightly soft. They will continue to set as they cool. For extra chegrape juicess, err on the side of underbaking slightly. The key is to look for the edges to be set and lightly golden, while the centers still appear a little underdone. Once baked, let the cookies cool on the baking sheets for 5 minutes before transferring them to a wire rack to cool completely. This allows them to firm up without becoming brittle. The aroma that fills your kitchen during this process is simply divine! Enjoy these delightful, soft, and chewy lemon cookies with a glass of milk or a cup of tea. They are best enjoyed within a few days, stored in an airtight container at room temperature.

Conclusion:
I hope you’re as excited as I am to dive into making these incredibly delicious Soft & Chewy Lemon Cookies! This recipe truly delivers on its promise, offering that perfect balance of a tender crum extractb with a delightful chew, all bursting with bright, zesty lemon flavor. They’re straightforward enough for a begin extractner baker yet impressive enough for any occasion. The aroma alone as they bake is enough to brighten your day! These cookies are fantastic on their own, but I also love pairing them with a cup of hot tea for a comforting afternoon treat, or even serving them alongside a light, summery dessert. Don’t be afraid to get creative with variations – a touch of poppy seed can add a lovely textural contrast, or a hint of lavender could elevate the floral notes. I genuinely encourage you to give these Soft & Chewy Lemon Cookies a try; I’m confident you’ll adore them as much as I do!
Frequently Asked Questions:
Can I make these cookies ahead of time?
Absolutely! The dough can be made up to 2 days in advance and stored, covered, in the refrigerator. Just let it sit at room temperature for about 15-20 minutes before scooping and baking for the best results. Once baked, they’ll stay fresh in an airtight container at room temperature for up to 3-4 days.
What kind of lemon is best for these cookies?
Fresh lemons are always the star! I prefer using Meyer lemons for their slightly sweeter, more floral flavor, but regular Eureka or Lisbon lemons will also yield fantastic results. Ensure you zest the lemon before juicing it, as the zest contains the most concentrated lemon oil and flavor.
My cookies spread too much. What went wrong?
Several factors can contribute to excessive spreading. Ensure your butter and sugar were properly creamed but not over-creamed, which can incorporate too much air. Also, make sure your baking soda is fresh and active. Chilling the dough for at least 30 minutes before baking can also significantly help prevent over-spreading and promote that desirable chewy texture.
Soft & Chewy Lemon Cookies
Delightfully soft and chewy cookies bursting with bright lemon flavor. Perfect for any occasion.
Ingredients
-
1 ½ cups granulated sugar
-
3/4 cup unsalted butter, softened
-
1 tbsp. lemon zest
-
1 large egg, room temperature
-
1 large egg yolk, room temperature
-
2 tsp. lemon extract
-
3 cups all-purpose flour, spooned and leveled
-
1 tsp. baking soda
-
1 tsp. cornstarch
-
3/4 tsp. salt
-
2 tbsp. lemon juice
-
¼ cup granulated sugar, for rolling & garnishing
Instructions
-
Step 1
Preheat oven to 350°F (175°C). Line baking sheets with parchment paper. -
Step 2
In a large bowl, cream together the granulated sugar and softened butter until light and fluffy. -
Step 3
Beat in the lemon zest, room temperature egg, room temperature egg yolk, and lemon extract until well combined. -
Step 4
In a separate medium bowl, whisk together the all-purpose flour, baking soda, cornstarch, and salt. -
Step 5
Gradually add the dry ingredients to the wet ingredients, mixing until just combined. Stir in the lemon juice. -
Step 6
Roll dough into 1-inch balls and then roll each ball in the ¼ cup of granulated sugar for rolling and garnishing. Place cookies 2 inches apart on the prepared baking sheets. -
Step 7
Bake for 9-11 minutes, or until the edges are lightly golden and the centers are still soft. Do not overbake. -
Step 8
Let cookies cool on the baking sheets for a few minutes before transferring them to a wire rack to cool completely.
Important Information
Nutrition Facts (Per Serving)
It is important to consider this information as approximate and not to use it as definitive health advice.
Allergy Information
Please check ingredients for potential allergens and consult a health professional if in doubt.