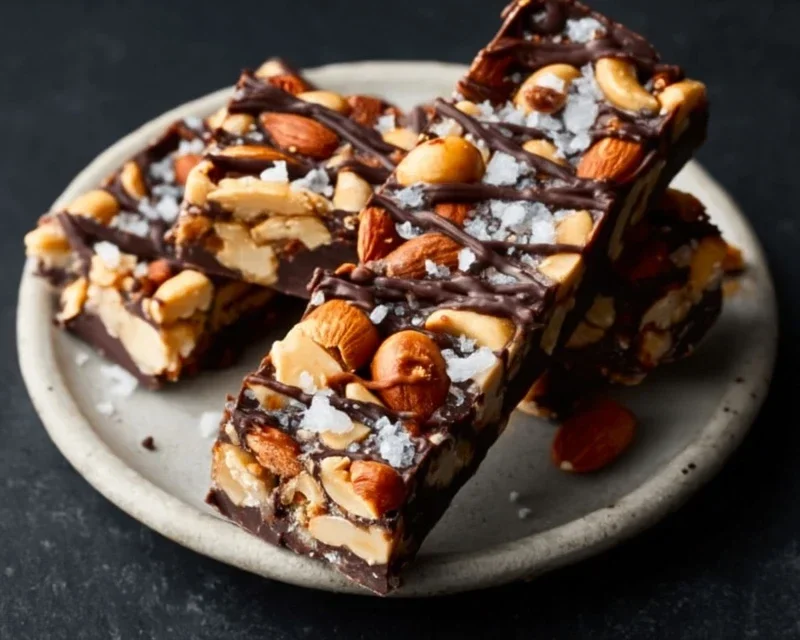
Dark Chocolate Sea Salt Nut Bars-Easy Recipe
Dark chocolate and sea salt nut bars are an absolute revelation, a perfect symphony of rich, bittersweet indulgence and a delightful salty crunch that I simply can’t get enough of. If you, like me, find yourself craving a sophisticated treat that’s both satisfying and surprisingly simple to whip up, then you’ve come to the right place. These aren’t your average bland granola bars; oh no. We’re talking about a deeply decadent experience that elevates snacking to an art form. The magic lies in the interplay of intensely flavored dark chocolate, toasted nuts providing a hearty chew, and those irresistible flecks of sea salt that cut through the sweetness, awakening every single taste bud. They’re the ultimate pick-me-up, perfect for an afternoon energy boost or a post-dinner indulgence without the guilt of overly processed sweets. Get ready to fall head over heels for these amazing dark chocolate and sea salt nut bars!
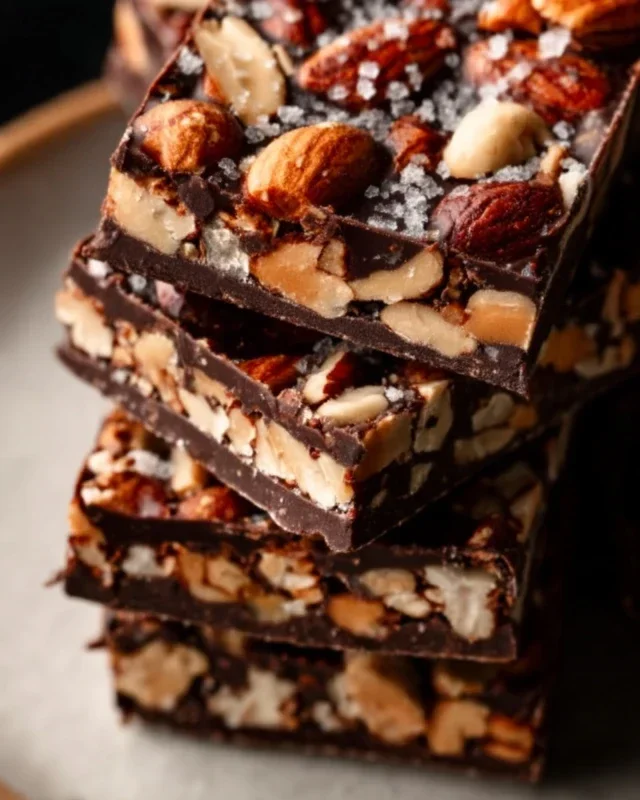
Dark Chocolate and Sea Salt Nut Bars
There’s something incredibly satisfying about a homemade bar packed with wholesome ingredients and a delightful flavor combination. These Dark Chocolate and Sea Salt Nut Bars are exactly that – a perfect blend of crunchy nuts, chewy textures, rich dark chocolate, and that irresistible hint of sea salt. They’re wonderfully adaptable, making them a fantastic go-to for a quick breakfast on the go, a healthy afternoon snack, or even a delightful post-workout treat. Forget those store-bought bars filled with who-knows-what; these are simple to make and taste infinitely better. The interplay of sweet chocolate, salty accents, and nutty goodness is truly a winner. I love that I can control the quality of ingredients and customize the nut blend to my liking.
Ingredients:
Cooking Instructions:
Preparation is Key: Get Your Workspace Ready
Before you even think about mixing, it’s a good idea to prepare your baking pan. I like to use an 8×8 inch square baking pan. Line it with parchment paper, leaving some overhang on the sides. This will act like handles to easily lift the finished bars out of the pan once they’ve set. Make sure the parchment paper covers the bottom and sides completely to prevent sticking. If you don’t have parchment paper, you can grease the pan well with butter or oil and then lightly dust it with flour, but parchment paper is definitely the easiest method for a clean release.
Step 1: Toasting the Nuts (Optional but Recommended)
While you can certainly use raw nuts, toasting them really elevates the flavor and adds a wonderful depth. Preheat your oven to 350°F (175°C). Spread your chosen nuts (cashews, peanuts, almonds, or any combination you prefer) in a single layer on a baking sheet. Toast them for about 8-10 minutes, or until they are fragrant and lightly golden brown. Keep a close eye on them, as nuts can go from perfectly toasted to burnt very quickly. Once toasted, remove them from the oven and let them cool completely. This cooling step is important because you don’t want to melt the chocolate prematurely. After cooling, you can roughly chop them if you prefer smaller pieces, or leave them whole if you like a chunkier bar.
Step 2: Combining the Dry Ingredients
In a large mixing bowl, combine your cooled, chopped nuts and the puffed rice. The puffed rice adds a lovely lightness and crunch that contrasts beautifully with the denser nuts. Give them a quick stir to distribute everything evenly. Make sure there are no clumps of puffed rice. This is the foundation of our bars, so getting it right sets us up for success.
Step 3: Creating the Binding Syrup
In a small saucepan, gently heat the brown rice syrup over low heat. You don’t want to boil it, just warm it enough so it becomes more fluid and easier to incorporate. Stir in the vanilla extract and the 1/2 teaspoon of sea salt. The brown rice syrup acts as the “glue” that holds everything together, and the vanilla and sea salt will infuse the entire bar with their delicious flavors. Whisk gently until everything is well combined and the syrup is smooth.
Step 4: Mixing It All Together
Pour the warm syrup mixture over the nut and puffed rice mixture in the large bowl. Now, it’s time to mix everything thoroughly. Use a sturdy spoon or a spatula to ensure that every piece of nut and puffed rice is coated in the syrup. This step requires a bit of elbow grease. You want to make sure there are no dry pockets of nuts. The mixture will be quite sticky. Don’t be afraid to really work it to ensure even distribution. This is where the magic happens, bringin extractg all the individual components into a cohesive mass.
Step 5: Pressing the Mixture into the Pan
Transfer the sticky mixture into your prepared baking pan. This is where that parchment paper overhang really comes in handy! Use the back of your spoon, or even a piece of parchment paper placed on top of the mixture, to press the mixture down firmly and evenly into the pan. The firmer you press, the more compact and less crum extractbly your bars will be. You want to create a solid, dense layer. Really pack it down, especially into the corners. This is crucial for the bars to hold their shape once they’re cut.
Step 6: Melting and Drizzling the Chocolate
Once the nut mixture is firmly pressed into the pan, it’s time for the star: dark chocolate! In a heatproof bowl, combine the dark chocolate chips and the coconut oil. You can melt this in two ways: either in the microwave in 30-second intervals, stirring well between each interval, until smooth and melted, or over a double boiler (a bowl set over a pot of simmering water, making sure the bottom of the bowl doesn’t touch the water). Stir the coconut oil into the chocolate chips. The coconut oil helps the chocolate melt smoothly and gives it a lovely sheen. Once the chocolate is melted and smooth, drizzle it evenly over the top of the pressed nut mixture in the pan. You can use a spoon or a spatula to spread it out if needed, but a rustic drizzle is often beautiful.
Step 7: Adding the Finishing Touches and Chilling
For an extra pop of flavor and visual appeal, sprinkle a little flaky sea salt over the melted chocolate while it’s still wet. This enhances the sweet and salty profile beautifully. Then, place the pan in the refrigerator for at least 2-3 hours, or until the chocolate is completely set and the bars are firm. You can also pop it in the freezer for about an hour if you’re short on time, but the refrigerator is generally best for a more even set. Patience here is key for clean cuts.
Step 8: Cutting and Enjoying
Once the bars are fully chilled and set, use the parchment paper overhang to lift the entire slab out of the pan onto a cutting board. Use a sharp knife to cut the slab into your desired bar sizes. I usually get about 12-16 bars depending on how thick I make them. Store the bars in an airtight container in the refrigerator to keep them fresh and firm. They should last for about a week, though I doubt they’ll be around that long! Enjoy these delightful, homemade treats!
Conclusion:
And there you have it – a simple yet incredibly satisfying recipe for Dark Chocolate and Sea Salt Nut Bars! These bars are a true winner because they strike that perfect balance between rich, decadent dark chocolate and the satisfying crunch of various nuts, all elevated by a whisper of flaky sea salt. They’re not overly sweet, making them an ideal treat for any time of day, whether you need a midday energy boost or a healthier dessert option. I truly hope you’ll give these Dark Chocolate and Sea Salt Nut Bars a try; you won’t be disappointed!
I love serving these bars as a post-workout snack, sliced and packed into lunchboxes, or even crum extractbled over yogurt for an extra layer of texture and flavor. For variations, feel free to experiment with different nut combinations – almonds and pecans work wonderfully, or perhaps add some dried cranberries for a touch of tartness. You could also swirl in some natural peanut butter for a classic flavor pairing or incorporate a pinch of cinnamon for warmth.
Frequently Asked Questions:
Can I make these nut bars vegan?
Absolutely! Simply ensure you use dairy-free dark chocolate chips or chunks. Most dark chocolates are naturally vegan, but it’s always a good idea to check the ingredients list to confirm. The rest of the ingredients are typically vegan-friendly.
How long will these bars last?
Stored in an airtight container at room temperature, these bars should stay fresh for about 5-7 days. For longer storage, you can keep them in the refrigerator for up to two weeks, or even freeze them for a couple of months. They thaw beautifully!
What kind of nuts are best to use?
I’ve found a mix of your favorite nuts works best for texture and flavor. Walnuts, almonds, pecans, and cashews are all excellent choices. You can use a single type of nut if you prefer, or create your own custom blend.
Dark Chocolate and Sea Salt Nut Bars
Chewy and satisfying nut bars with a rich dark chocolate drizzle and a hint of sea salt.
Ingredients
-
2 1/2 cups unsalted nuts of choice (3/4 cup cashews, 3/4 cup peanuts, 1 cup almonds)
-
1/2 cup puffed rice
-
1/4 cup brown rice syrup
-
1 1/2 teaspoon vanilla extract
-
1/2 teaspoon sea salt
-
1 cup dark chocolate chips
-
2 teaspoons coconut oil
-
flaky salt for topping (optional)
Instructions
-
Step 1
Line an 8×8 inch baking pan with parchment paper, leaving an overhang on the sides. -
Step 2
In a large bowl, combine the mixed nuts and puffed rice. -
Step 3
In a small saucepan, gently heat the brown rice syrup, vanilla extract, and 1/2 teaspoon sea salt over medium-low heat until warm. Do not boil. -
Step 4
Pour the warm syrup mixture over the nut and puffed rice mixture. Stir well to coat everything evenly. -
Step 5
Transfer the mixture to the prepared baking pan and press down firmly and evenly to form a compact layer. -
Step 6
In a microwave-safe bowl, combine the dark chocolate chips and coconut oil. Microwave in 30-second intervals, stirring between each, until melted and smooth. -
Step 7
Pour the melted chocolate over the nut base and spread evenly. Sprinkle with flaky salt, if desired. -
Step 8
Refrigerate for at least 1 hour, or until the chocolate is firm. -
Step 9
Lift the bars out of the pan using the parchment paper overhang. Cut into desired bar shapes.
Important Information
Nutrition Facts (Per Serving)
It is important to consider this information as approximate and not to use it as definitive health advice.
Allergy Information
Please check ingredients for potential allergens and consult a health professional if in doubt.